


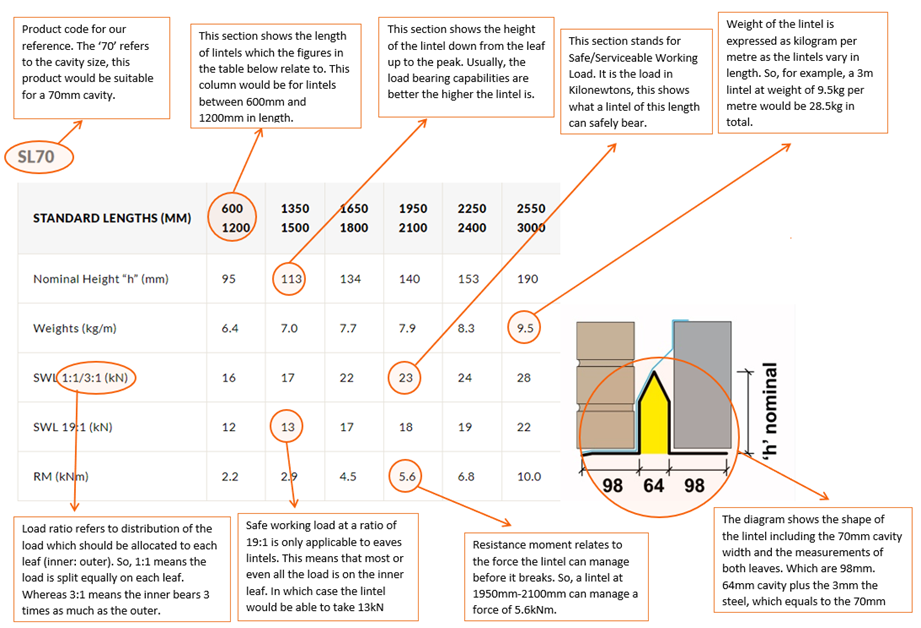
Steel Lintel Load Table
You may have seen some specification tables on our product pages for our steel lintels. But, you aren’t too sure what all the parts really mean? Well, you’re in the right place! Let us tell you!
Below is a detailed diagram of what all the parts of our specification tables mean.
Concrete Load Span Tables
The concrete lintel specification tables are similar to steel lintels, however, there are two slight differences.
- So, the first difference is the UDL which stands for ‘Uniformly Disturbed Load’, this is measured in kilonewtons per metre, this will be shown on the table as kN/m. They are simply the opposites of what the steel load tables are, steel load bearing capabilities go up as the length increases. Whereas, with prestressed concrete it is quite the opposite, the longer the length the lower the load bearing capabilities.
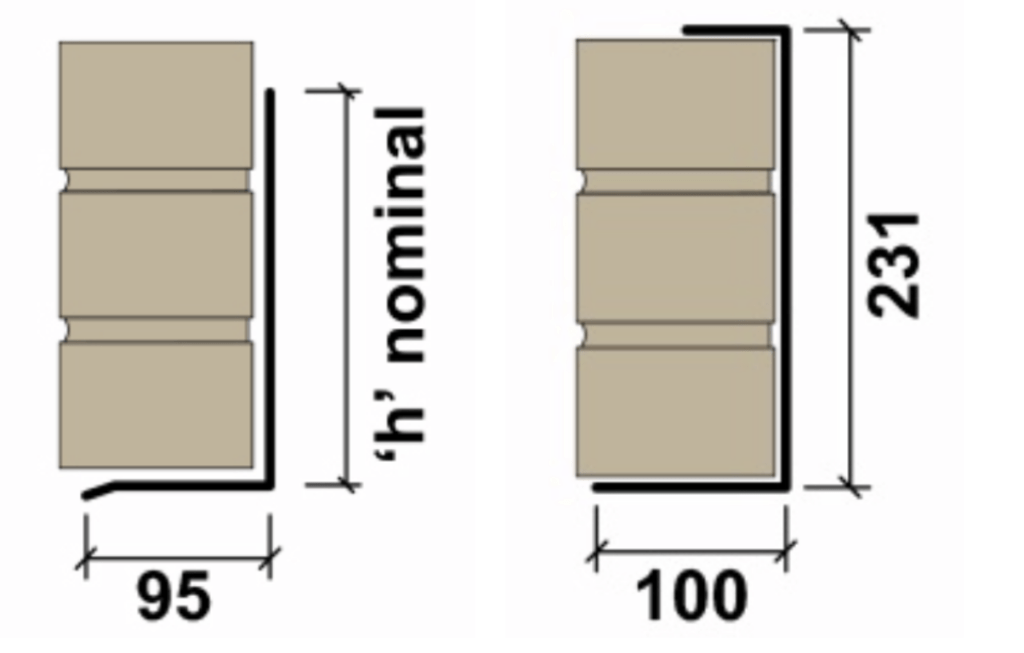
- Clear span is the length of the opening. So, if for example you have a clear span of 1500mm, you will need a 1800mm this is to fit the required span of 150mm each end of the opening.
- Good thing you may want to know, our concrete fire rating is 30 minutes.
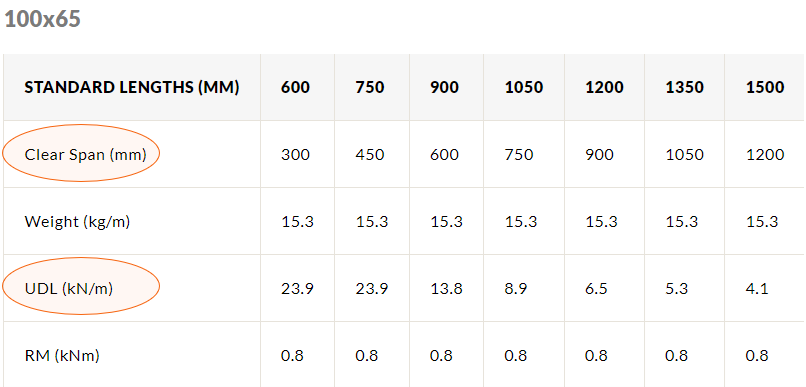
Very important thing to remember is not to confuse the kNm with kN/m. They are very similar, and it is so easy to confuse the two. However, the kN/m is kilonewtons per metre or divided by metre. Whereas, kNm is a force measurement where kilonewtons are times metres.
Click box above and ask us a question!
At UK Lintels, we have designed our own concept of Thermally Efficient Lintels. Which are the most cost effective and most available from stock, on the market!
What are they?
They’re an energy efficient type of steel lintel used in masonry cavity wall constructions. They provide support over the structural openings (doors and windows), whilst reducing linear thermal bridging heat loss compared to regular cavity lintels. Our own brand version is a split lintel solution. Split lintels are also the most thermally efficient lintel on the market with 0.010 Psi value (Catnic BSD & Angle) compared to 0.043 (Catnic one piece Thermally Broken Lintels).
Psi Value Image Source: Catnic Sept 2022 Product brochure & Separate Lintels Full Fill cavity Wall Construction Psi values 5-2-15. Split lintel data an example of using a Catnic BSD insulated & ANG angle lintel. UltraTherm lintels are am alternative to these two lintels.
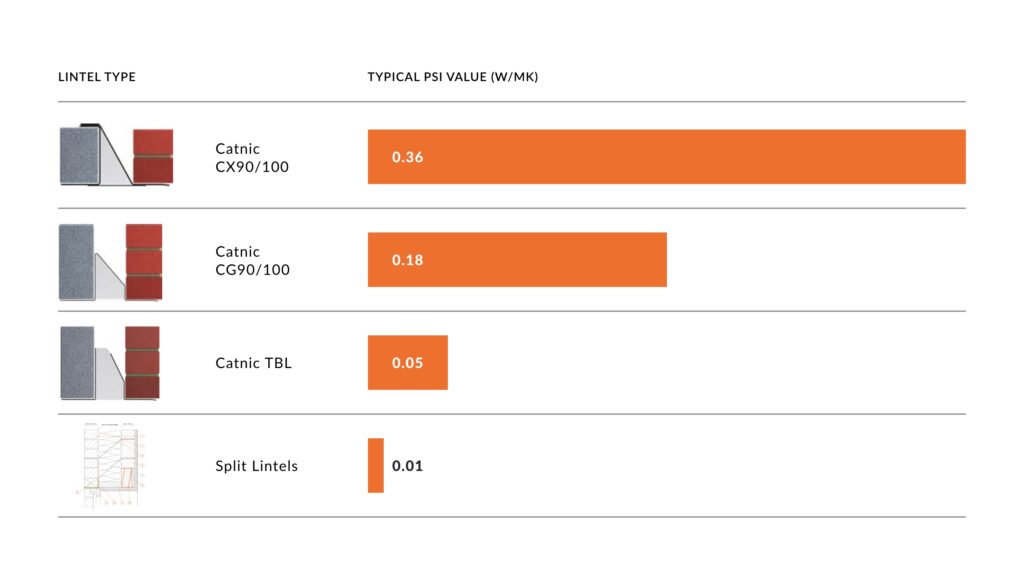
Thermally Efficient Lintel PSI Values Comparison, the graph highlights the typical psi values that can be achieved by using various lintel solutions.
What are the advantages of our UltraTherm Lintels?
- It is the most versatile energy efficient lintel solution on the market.
- This is the most available thermally efficient lintel system, all items are in stock and available for Next Day & Fast Track delivery. Therefore, no costly down time waiting for materials.
- It is the most cost effective (available from stock) thermally efficient lintel solution on the market.
- Suitable for any cavity size. There are no restrictions on cavity widths.
- There is an insulated internal box, therefore, your cavity and the inner leaf is insulated. You do not have this with a one piece thermal lintel.
Why use an UltraTherm Lintel?
Using an energy efficient lintel improves the thermal performance of the wall and focuses on the increasing proportion of heat lost through thermal bridges. Lintels can be a major thermal bridge in a building. Therefore, the lower the psi value, the better for the overall performance.
How can I improve the psi values?
- You may use things such as:
- Lintels with perforated base plates.
- Lintels without base plates.
- UltraTherm split lintels (which is a separate lintel for the inner and outer leaf).
- Thermally broken lintels (Catnic | IG Keystone | Birtley).
Thermal Performance
Target fabric energy rates, target CO2 emission rates, and target primary energy rates for the foundations of the Building Regulations Part L 2021. They set the energy requirements for the new buildings and are all influenced by the performance of the fabric. Selecting a Thermally Efficient Lintel can play a significant role in reducing heat loss associated with thermal bridging.
Heat loss through the building fabric is expressed as a U value and measured in W/M2K, while heat loss via linear thermal bridges is expressed as a psi value and measured in W/Mk. The total fabric heat loss is the sum of the combined fabric U value multiplied by the total area, plus the product psi value of junctions and their total length.
Improving the thermal performance of the wall emphasises the increasing proportion of heat lost through thermal bridges in the building fabric such as lintels. Lintels can be a major thermal bridge in a building, and the lower psi value, the better for overall performance.
Buildability Myths of 2 piece lintels vs 1 piece lintel
There are some myths (created by the manufacturers of the product) that using split lintels isn’t as efficient for buildability purposes. We give some simple answers to those myths;
- Confusion over site installation. One piece manufacturers argue that they are easier to install. We’ve produced an installation guide (right) to assist in the installation of a UltraTherm Split Lintel. Building two courses with separate lintels is not a new concept and will not be alien to any experienced bricklayer. A competent bricklayer will see no issue with this detail.
- No DPC required for a one piece lintel. A DPC is required for a UltraTherm lintel but we would endorse that it is good practice for any opening to have a separate DPC installed above the lintel. IG/Keystone even show this in blue in their product image online and in their brochure. For many areas of the UK a separate DPC is still required for any lintel as per NHBC guidelines.
- Cavity Closer required – Yes, a one piece lintel does close the cavity without a cavity closer but these are very inexpensive items at around £9 for a 2.4m length and available off the shelf. The cavity closure also provides a better overall site detail.
- Lack of stability – Stability between the inner and outer leaf comes from the wall ties. The one piece lintel has very little impact on stability and once the mortar has cured even less.
- Angle and Channel lintels to the outer leaf need to be propped. Whilst it is always good practice to prop single leaf lintels they do not need propping up to 1200mm long as long as they are installed with 2 courses of bricks, allowing the mortar to fully cure before applying further load. 1350mm–2400mm (1 prop), 2550–3600 (2 props), 3750-4800 (3 props).
What we offer
In our Thermally Efficient Split Lintels we offer different duties (Standard, Heavy, Extra Heavy) and various inner/outer leaf sizes to suit your requirements.
This lintel solution is in stock and available for Collection from our branch in Bristol, Next Day Delivery or Fast Track Delivery, Nationwide.
Any more questions?
No problem! You can contact us our technical team will be happy to assist you!
Don’t know where to start? Not to worry, let us help you!
A question we get asked frequently is, how to fix a curtain pole or track to a steel lintel. So, below is some guidance but generally it depends on the type of steel lintel in place.
Traditional cavity lintels allow for a masonry block to be on the inner leaf. Therefore, you will be fixing to the masonry inner leaf of the wall and not the steel lintel as per the below diagram. Some inner leaf lintels are known as wide inner leaf, where the inner leaf will be thicker 125-150mm as opposed to a more traditional 100mm inner leaf.
You may want to consider the following, when drilling into masonry or concrete lintels.
- Start with a small masonry drill bit around 3mm, drill a shallow hole on low power.
- Then, increase the drill size gradually to one required and increase the speed.
- Every 10 seconds or so, remove leftover dust and debris.
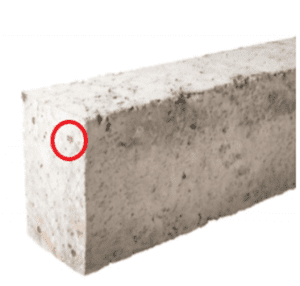
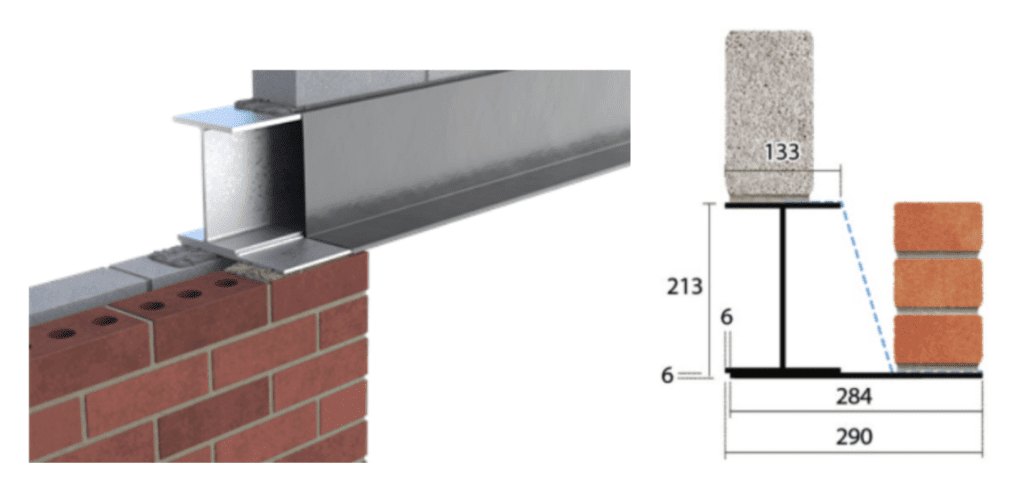
- If you find resistance in the concrete lintel you may have hit the reinforcing bar which are typically 10-12mm in diameter. In this instance you could either move your fixing hole or use an SDS drill bit (Slotted Drive System) to penetrate the reinforcing bar. The picture below shows a 140×215 hi-strength concrete lintel and the circle shows the reinforcing bar in each corner, which will run throughout the concrete lintel length.
- An important thing to remember when you are drilling any holes is, that it is crucial to hold your drill straight. This is important so, the hole is straight. Otherwise, when you insert any fixings or screws, they will sit at an angle.
- Once the hole is suitably drilled to the correct depth, use a suitable RAWL plug and screw to fix your brackets.
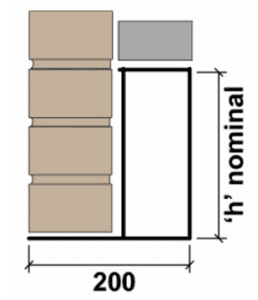
- However, some lintels have a steel inner leaf like internal box lintels. These are often trickier to fix to. The reason being, the installer may come across some resistance when he ‘hits’ the steel lintel. The diagram below shows a steel box lintel in a 200mm solid wall (a lintel often used above garage doors). When drilling from the inside you will penetrate the plasterboard, then hit the steel box lintel after about 10-20mm. This will therefore require a different method of fixing.
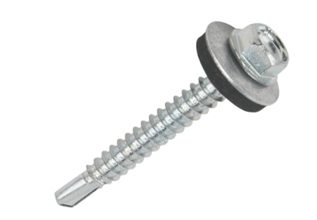
Things to consider when you are drilling into steel lintels.
- Start with a small masonry drill bit around 3mm.
- After you penetrate the plaster, you will reach the steel lintel. Don’t continue to drill into the steel lintel.
- Change your drill bit for a high-speed steel bit using self-tapping screws or often referred to as Tek-Screws locating the original pilot hole drilled.
- Titanium coated or bullet tip drill bits are most appropriate when drilling into steel lintels. Also, using cooling paste for the drill bits will stop it from overheating and will cut through more effectively.
Tips & Mistakes to Avoid
- Always remember to wear eye & breathing protection (such as a mask and goggles). This way you will avoid inhaling any dust coming from the drill or getting any dust/debris/steel splinters in your eyes.
- Battery powered drills aren’t recommended for drilling into lintels. The reason being, they do not have enough power to drill through a steel or a concrete lintel. Also, using a battery powered drill could take a lifetime! Instead try a SDS drill (as mentioned in points above), this will be way more powerful and more effective for the job!
- Take your time. Drilling a hole into a concrete lintel will need your full concentration to avoid crumbling or breaking of the lintel, you cannot rush. It is important to take often breaks while doing this task. Mainly, to double check on your drill bit as due to the pressure, it may need replacing before continuing drilling.
Every house has a number of openings for doors and windows. Most of these are in structural load-bearing walls. These walls are critical to the building structure as they carry the load of the floor above them and the roof.
To support this weight, you need a solid lintel to span the gap and transfer the weight onto the surrounding walls. Each lintel must be carefully positioned and installed according to specific U.K. building regulations. By following these, you know that your lintel is capable of supporting the load above it.
Concrete lintels are a common type of lintel due to their low cost and long-term resistance to fire and corrosion. They also offer superior thermal insulation and can prevent cold bridging problems that occur with steel lintels.
If you’re interested in learning about concrete lintels and the best way to install them, you’re in the right place. In this guide, we’ll explain what the advantages of concrete lintels are and how to ensure they’re professionally installed.
How Lintels Work in Your Home
Whenever you have an opening in a wall the weight of the structure above it needs to be supported. A concrete lintel beam distributes this load onto the surrounding masonry. Without a lintel, all of the building’s weight would rest on top of the window or door frame.
These wooden and aluminium frames are not designed to withstand heavy loads. In comparison, precast concrete lintels are specifically designed and built to resist large downward forces. They distribute this pressure onto the adjacent walls which are then supported by the building floor slab and foundations.
Concrete lintels are usually constructed with steel bars embedded in the concrete. These reinforce the concrete and provide the structural integrity to resist large compressive loads. The steel also gives the lintel a small amount of flexibility to bend without breaking.
Why You Might Need a Lintel
If you’re planning some DIY home renovations that involve new windows or doors, it’s vital to find out which walls are load-bearing. Breaking open non-load bearing walls is possible for a home builder enthusiast that has some building experience.
It is not advisable to attempt to make changes to a load-bearing wall without the help of a professional builder. Structural alterations can be extremely dangerous and need to be approved by an engineer before you can make any new window or door openings.
Stressline Performance for Concrete Lintels
UKLintels are major stockists and suppliers of Stressline concrete lintels which are designed with concrete strength 50N/mm2 and offer a minimum of ½ hour fire resistance.
Apart from 140×65 and 215×65 lintel sections all other STANDARD lintels are reversible, which means that they can be used either way around to suit the wall construction. Always check loadings against our load span tables.
Hi-Strength lintels are marked ‘TOP’ and the surface must be kept at uppermost all times.
Steps to Install Concrete Lintels
Concrete lintel installation is a fairly easy process if you are building your home from the ground up rather than renovating existing walls. In this guide, we’ll discuss how to install a lintel in a new wall. Let’s break down each step in more detail.
1. Calculate Load-Bearing Weight
When buying concrete lintels online, it’s important to check the load distribution tables associated with the lintel and to seek advice from a structural engineer as to what section of concrete lintel is required.
These will give you the uniformly distributed load (UDL) that the lintel can support in kiloNewtons per meter (kN/m). They will also provide you with the resistance movement (RM) for each lintel.
2. Tools Needed
As most lintels are installed above head height, it’s important to have some sturdy scaffolding that can support your concrete lintel weight. You will also need a selection of standard masonry tools.
These should include:
- Masonry hammer
- Masonry chisel
- Mortar trowel
- Masonry square
- Spirit level
- Masons line
- Tape measure
- Brush
- Shovel/cement mixer
- Mortar bucket
3. Bed on Mortar
On each side of the lintel, you need to have enough space to adequately support the lintel. This is known as the minimum end bearing and should be at least 150mm. For lintels shorter than 1m, you can reduce this to 100mm. With lintels longer than 3m, you should extend it to 200mm.
Lintels should always be supported by full bricks or padstones to provide a solid base. Never use a cut brick and mortar as the base of the lintel as this will not distribute the weight evenly.
Once you’ve mixed up a nice firm consistency mortar you can apply it to the support on either side. Aim to distribute the mortar evenly on both sides. You can then place the lintel in position and bed it down into the mortar to ensure a thorough connection.
When installing a long lintel over 1.2m, it’s advisable to prop the lintel up at the centre point. You should leave this support in place until the mortar has set.
4. Ensure Its Level
As soon as the lintel is in position, it’s vital you use a spirit level to make sure it’s completely flat. It’s very important to spread the load evenly onto both sides of the support. You can use a straight edge laid along the top of the lintel to get a more accurate reading on your level.
It’s also important to check the level across the width of the lintel. This will provide you with a flat surface to place the next row of bricks on. Failing to check this can result in the rest of your wall having an undesirable angle.
Most walls require two lintels side by side to match the width of the wall. By making sure that these are exactly level you can distribute the load evenly across both lintels. If one is slightly higher than the other, you risk putting excess stress on the higher lintel.
Make sure the masonry must not overhang the lintel by more than 25mm.
5. Wait for the Mortar to Cure
Before you put any load on your new lintel, it’s important to allow the mortar enough time to dry. Depending on the environmental conditions, you should wait at least 24 to 36 hours. This is extremely important to keep the lintel completely level.
Once the mortar has cured you can then continue to build your walls. In some situations, it may be necessary to install a damp-proof course above your lintel. When that is in position, you can start laying bricks on the lintel. All external wall lintels MUST be installed with a DPC.
Always position your bricks in a way that evenly distributes the weight across the lintel. Avoid applying too much weight to either side as this can cause structural problems within the lintel. Avoid shock loading of lintels during the installation of concrete floor units and any sideways loading while being fitted into position. Precast flooring units should be laid on a mortar bed across the whole wall width and should not be dragged over supports.
6. Inspect the lintel prior to installation
Before you install the lintel, the lintel should be explained to check for any defects or signs of damage. You should also check it is the correct section as per your engineers calculations.
Advantages of Concrete Lintels
Precast concrete lintels have a number of benefits when compared to steel lintels. The most significant of these is the price difference. Concrete lintels are a considerably more cost-effective option than any other type of lintel.
If you live near the coast, then you’re all too familiar with the corrosive effects of salt-laden air. The steel reinforcement in concrete lintels is encased in concrete and this means they are less susceptible to corrosion.
Another benefit of concrete lintels is that they are more resistant to high temperatures resulting from fires. When steel is heated, it loses its structural integrity and can fail. Concrete lintels will last longer in the event of a house fire and will help prevent further damage.
Are You Looking for Concrete Lintels?
Concrete lintels are the most economical way to support your doorway and window openings. They are easy for hobbyist builders to install and don’t require specialist knowledge or equipment.
If you’re looking for any type of lintel, then make sure you check out UK Lintels. We have over 35 years of experience providing a wide variety of lintels and are a fully CE accredited company for fabricated steelwork.
We only sell lintels that we already have in stock, so there’s no delay when ordering lintels from us. Our team provides next-day delivery across mainland England, Wales and Scotland. You can contact us online or call us at 033 3016 9789 to discuss your requirements.
In construction, windposts serve an essential purpose in providing stability. A windpost is a vertical steel structure usually spanning vertically between floors. Windposts are supplied as a complete kit to include the vertical stem, bottom connection, top connection and wall ties and sometimes come with a fixing pack.
The United Kingdom experienced record wind speeds of 122 miles per hour when Storm Eunice hit in early 2022.
We are no strangers to extreme winds in this part of the world. It is more important than ever to ensure stability when constructing homes and buildings. Experts believe that climate change will bring about more severe weather events in the years to come.
When it comes to construction, a windpost is a popular solution to provide extra stability to a wall.
Hundreds of years ago, our forefathers used heavy and oversized blocks of stone in their construction. A benefit of this is that it gave buildings added stability. Modern technology has made it quicker and easier to build houses.
But it has given us thinner masonry walls. This means we need extra support to ensure our homes last long and withstand extreme weather events and other structural issues.
But, what is a windpost, and do you need one? This article will teach you everything you need to know about windposts and their uses in construction.
What is the purpose of a Windpost?
There is never a wrong time to add an extension to your home or start that home improvement project you have always dreamt of. Whether you are looking for more space or hoping to upgrade your home, a construction project can be a significant learning curve.
Suppose you are doing a whole new building project, a major renovation that requires building walls, or a whole new floor. In this case, you may find, to your surprise, that your builder or architect is suggesting you install construction windposts.
Imagine you want to remove a wall between your kitchen and living room to create an open-plan kitchen. This may seem straightforward. However, in some specific cases, it can require structural additions such as a windpost to stabilise the build or to split a large panel of masonry.
In construction, windposts serve an essential purpose in providing stability. A windpost is a vertical steel structure usually spanning vertically from foundation to first floor, between floors, or from floor to roof. Windposts are supplied as a complete kit to include the vertical stem, bottom connection, top connection and wall ties and sometimes come with a fixing pack.
In the past, if you needed stability, you would have built columns or made your walls thicker. If you tried this today, it would make your construction project much more expensive.
In recent decades there have been innovations in the building industry to make your walls more robust and resistant to bad weather and other forces. Windposts are an excellent way to add structural stability to your wall or to reduce the overall size of a panel of masonry.
Windposts are made of stainless steel or mild steel and post galvanized. However, you can fix them to a variety of materials. They can attach to timber, steel, or brick structures.
A structural engineer or architect who analyses your building plans will be able to recommend the proper spacing and placement of your windposts for your project as well as the Type of Windpost and the section size you require.
How are Windposts supported?
If you want to stabilise your walls with windposts, you cannot just place the steel structure between the layers of brick. They need to have anchor points to provide the stability you need.
Windposts are often installed between the inner and outer leaf of a wall. However, you can also place them inside a cavity wall without disturbing the blockwork.
The windpost will often be bolted down into the foundation and supported between different floors. To do this, you will attach the windpost using a specific tie or connection. The type of tie you need will depend on the frame and the design.
These wall ties play a crucial role in reducing the lateral load from the wall. They also allow the structure to move without cracking.
Wall ties will also be placed between the bricks at several points as the wall is constructed. An engineer will calculate the intervals at which you need to tie it. When you buy windposts for construction, you will use special screws and bolts to attach to a steel beam, concrete, or timber structure.
When do you need Windposts?
If a structural engineer has said you need to install windposts, you might be wondering why they are even necessary.
As their name suggests, windposts provide valuable protection to a structure if it faces exposure to high winds, earthquakes, or hurricanes. But they also offer stability from pressures that the structure itself can create and reduce the overall panel of masonry.
If you have an extensive panel of bricks or a wall that is longer than a certain distance, you may need several windposts to stabilise the structure. Your engineer may also recommend windposts if your building has several floors.
A classic use of windposts is for bi-folding or concertina doors.
We all want as much light as possible to enter our homes. In modern design, it is popular to have a large door sliding open to give full access to a terrace or garden.
The downside is that when you have such a wide opening in the brickwork, you lose stability. Windposts will be necessary to add the support you need.
If you live in an area with a high risk of extreme winds or earthquakes, you will also need to add windposts to your construction. Even living by the seaside could increase your exposure to elements which weaken the stability of your building.
When are Windposts not necessary?
If you are building a small, one-storey home, you may not require windposts. The same applies if you are only constructing a small extension.
In a tiny building, there are fewer instances of large panels of masonry that will impact the stability. Wind load is more of a concern in tall buildings that use heavy materials.
If you do not have large openings for big windows or sliding doors, you do not have to worry about installing windposts unless otherwise advised by your structural engineer.
Visit our Windpost Superstore now to build and order online.
Ever had a hard time ordering lintels online or getting a reliable delivery?
Buying Lintels online can be a frustrating experience.
How many times has your online (or traditional) builders merchant said ‘sorry, the lintels haven’t come in yet from the manufacturer’ or ‘we’ve been let down by our supplier’.
How many times have you been told it’s ‘out for delivery with the courier’ but with no clarity on when you’ll actually receive the goods?
The sad reality is that many are ordering in good faith that the product will turn up when the website says, only to be faced with bricklayers on site with nothing to do, floor joists or roof trusses due for installation, but you still have no lintels on site.
At UK Lintels, we solve this problem.
We are different as we only quote and advertise online what we physically have in stock and on the ground. Our online lintels store offers multiple options for delivery and collection:
- 48 hour click and collect from our depot in Bristol.
- Standard up to 8 working day delivery
- Guaranteed 2-4 working day fast track
- A next working day premium delivery service
Guaranteed certainty in lintel delivery
When ordering goods from Uklintels.com on our fast track and next day service we GUARANTEE delivery by the date specified when placing your order. We also provide a specific delivery date and a 5 hour time slot when your delivery will arrive. If we fail for any reason (and we haven’t once in over a year) we’ll refund your entire carriage charge in full. We also offer a guarantee for our standard delivery that we GUARANTEE to deliver your order up to 8 working days from ordering and from the ‘by date’ we provide when you place your order as per the below example;
Can any other company offer you that peace of mind?

Why the long lead times?
The reason for the long quoted lead times is historically due to online lintel merchants not carrying much or any stock. They wait until you purchase a product and then procure it OR deliver an alternative product to satisfy their contract with the online buyer.
The fact is that they are not in control of when they will source the product, nor how or when they can get it to you as they rely on third party couriers to deliver the goods. Often they don’t even see the product. They simply ask the manufacturer to make it and ship it to the buyer in a process that is often referred to as ‘brass plating’.
The result of all this means no control over the product, no control over quality and no control over delivery.
For transparency sake, here are the top four online merchants and their average lead time advertised online for steel lintels*:
UK lintels – 3 working days delivery (average)
Condell – 10-12 working days (average)
Lintels.co.uk – 30-40 working days Catnic / 18 working days IG / 15 working days Birtley
Building Supplies Online – 15-20 working days
Need quick and reliable lintel delivery?
UK Lintels deliver 95% of our goods on our own vehicles. We believe in controlling the experience and service to our customers which is why we don’t let them down and we don’t blame other people.
If you’re looking for a reliable supplier of lintels and building materials, UK Lintels offers;
- The largest single site stock holding of steel lintels in the UK
- The best lead times compared with any other merchant
- Delivery on our own fleet of vehicles, nationwide
- Advertisement of products which are physically in-stock
And we never;
- Have items on backorder or ‘due in status’
- Procure your items after you have purchased online
However, if buying at the very lowest price and not knowing when you may receive your goods sounds appealing to you, we accept you may buy elsewhere.
If you like what you’ve read, head over to the lintels section of our website.
* all lead times shown are correct at the time of writing (05/01/2022)
When you intend to build or make alterations to your home, you must ensure that the improvements are safe. For example, building new doors or windows is one of the most frequent alterations. Therefore, before beginning any work, you should get your property inspected to verify that the changes are safe.
You can’t just start tearing down walls without ensuring that the building site is ready for alterations. You call structures designed to sustain the original building load-bearing structures. You can jeopardize lintels, or load-bearing structures when you install a new door or window. If the structure is sufficiently weakened due to the alteration, the supporting structures may start to crack and even collapse.
Are you building a structure and don’t know what a steel lintel is? Then, let’s read further to discover the fundamentals and their significance.
What Is a Lintel
A lintel is a beam that spans openings in structures such as windows and doors and other openings to sustain the weight of the building above. The lintel beam’s width equals the wall’s width, and its ends are built into the wall. Lintels are categorized according to the material used in their construction.
In comparison to arches, horizontal lintels are simpler to build.
Lintels are most often made of wood, concrete or steel.
Timber Lintels
Timber is inexpensive, widely accessible, and quickly cut to size on site. It is, nevertheless, best suited to smaller gaps with modest load carrying.
Precast Concrete Lintels

Precast concrete lintels are cost-effective and offer enough support for brickwork above window and door openings. In addition, you can finish precast concrete lintels with a variety of surface treatments.
What Is a Steel Lintel?
Steel lintels are typically composed of pre-galvanized steel that has been cut and rolled or pressed into the desired shape.
Steel lintels have a benefit over concrete lintels in that they are often lighter and easier to handle at the site.
Steel is also adaptable, and it may be custom-made to fit a particular construction need, whether it’s arched, a corner, or creating a bay window, for example.
Lintel Applications
For every building project, it is essential to specify the right lintel. To help you better understand what kind of lintel you need with what project, we have described the correct application for each below.
Steel Lintel for Masonry Cavity Walls
Cavity wall building using masonry is the most prevalent kind of construction in the United Kingdom. An air cavity between the inner and outer leaves of brickwork may be completely or partly filled with thermal insulation depending on the use. Cavity walls need structural support for each brickwork leaf that is exposed via an opening.
The hollow wall’s build-up defines the specification for a cavity lintel, the size of the hole the lintel must bridge, and the load imposed by the building above. UKLintels offer a comprehensive line of steel lintels for ordinary and heavy-duty applications.
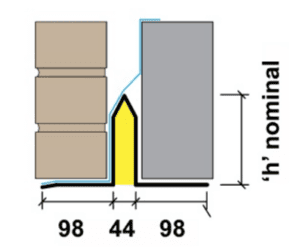
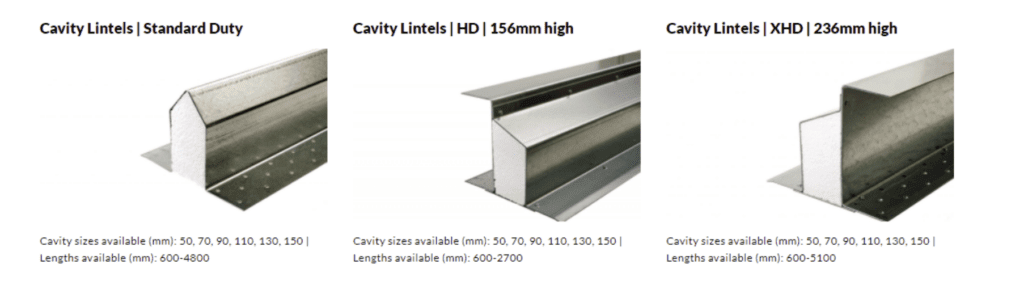
All cavity lintels have integrated insulation to assist minimize the steel’s thermally bridging effect. Cavity wall lintels are also available to suit Wide Inner Leaf and Wide Outer Leaf applications and are available from 50mm to 150mm cavity sizes.
Steel Lintels for Solid Outside Walls
The size of the opening that the lintel must span and the weight imposed by the building above define the lintel specifics. UKLintels provides two kinds of steel lintel for exterior solid walls, each with choices for normal and heavyweight loading situations.
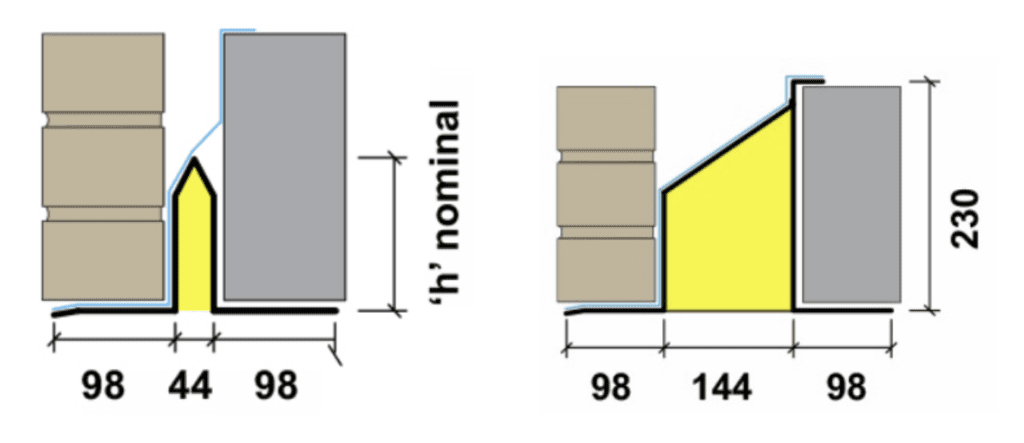
1. Box Style Lintels
The hollowed rectangular shape of Box Lintels is placed as part of the masonry’s inner skin. A protruding toe lies over the outer ‘skin,’ supporting the wall build-up in that area. If thermal insulation is being used in the wall, a box lintel with integrated insulation may assist in minimizing the effect of the steel on the total loss of heat through the wall.
2. Inverted T-Shaped Lintels
They’re precisely what they sound like: a foundation plate that covers the whole width of the wall and holds the brickwork. A central plate provides the lintel strength and lies in the middle of the wall structure. It lies in between the 2 brickwork skins, perpendicular to the centre of the lintel’s bottom. UKLintels also offer a heavy duty version of this lintel which is two ‘C’ section lintels spot welded back to back that work in the same way. These lintels are mostly used for fairfaced brickwork with two separate leaved of a 215mm fairfaced brick wall. Insulation that is built into the structure is not a choice.
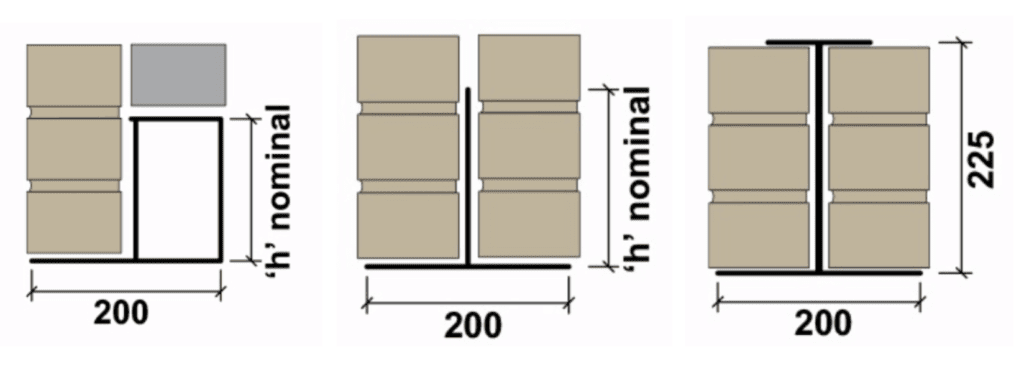
Steel Lintels for Inside Solid Walls
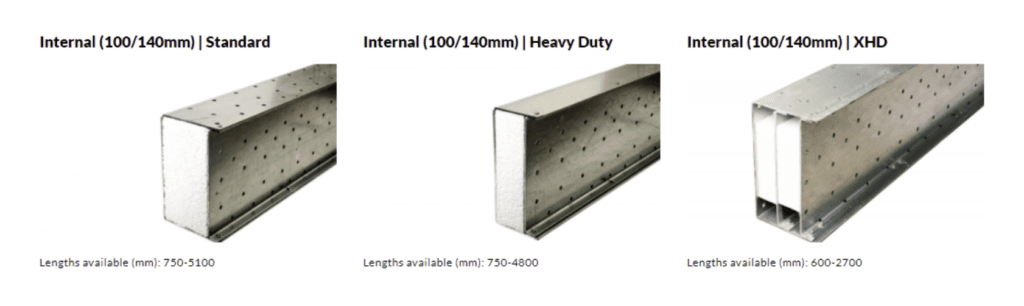
Steel lintels for solid interior walls are a low-cost option that offers a good combination of weight, strength, and resilience. There are various lintel designs available to meet diverse applications and load situations. These would be corrugated lintels, channel lintels and box lintels and are available to suit a 100mm wide wall or 140mm wide wall.
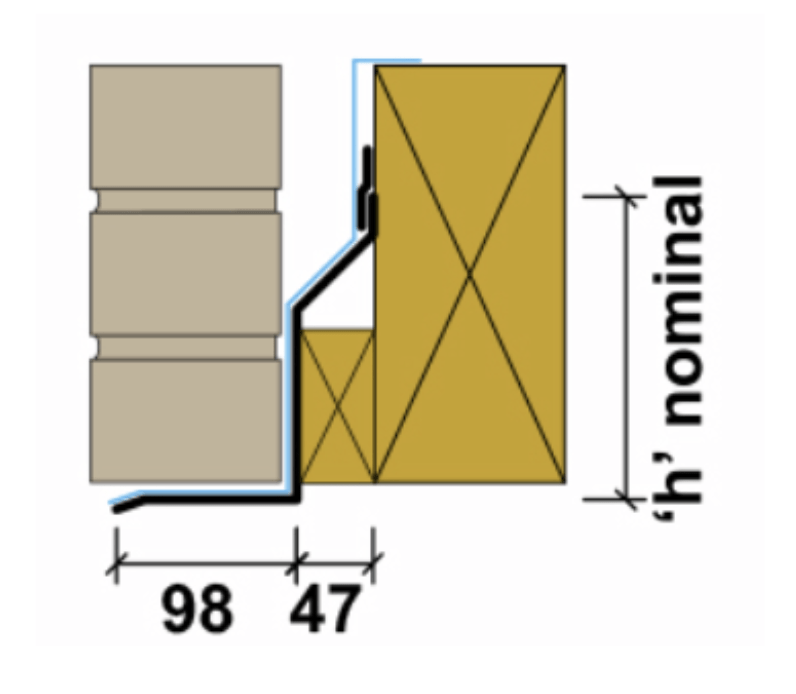
Steel Lintels for Closed Eaves

Closed eaves lintels offer structural support above gaps above a brick cavity wall, where the pitched roof meets the brick cavity wall. It distributes the weight of the roof and ensures that it can withhold the roof’s total weight.
Closed eaves lintels vary from brick cavity wall lintels in that no outside leaf masonry is constructed from the front toe.
This enables the inside leaf bricks to continue, and the brickwork must be completed with a continuous wood wall plate. With the lintel, the last phase of blocks and the wall plate provide the stated strength properties.
Thermal bridging occurs when insulation is not continuous between exterior walls and pitched roofs. To maintain the thermal envelope, lintels for closed eaves applications have integrated insulation.
Steel Lintels for Timber Frame Building
External framed walls made of timber are becoming more common for lighter weight, watertight, and thermally efficient structures. Steel lintel systems for wood-framed walls are lightweight, practical, and strong.
Lintels attach to the frame structure using restraining clips and a batten. You either screw or nail the clips (supplied with the lintel). With this restriction, the frame and outside leaf will not flex during assembly, attaining the stated loading values.
Timber frame lintels must also be properly supported during installation.
Steel lintels for single skin external solid walls
Designed to support a single skin of masonry wall in either brickwork, blockwork or stone. These lintels are either 100mm, 120mm or 137mm wide and vary in height as the lintel lengths increases.
Extreme Load Lintel
Designed to be used for extreme loading conditions or when the permissible deflection on a lintel needs to be reduced or eliminated. This is why these lintels are often used for bi-folding doors or for larger clear span openings. The wide bottom plate manufactured from 6mm steel and galvanized to BS EN1461 gives this style of lintel complete flexibility as it can be used for cavity wall construction, wide inner leaf, wide outer leaf or solid wall openings such are wide span double or triple garage door openings.
Thermally efficient lintels

Catnic’s unique design enables a complete thermal break between the inner and outer leaf of the cavity wall construction. The Catnic TBL range offers a practical solution to the latest changes in Building Regulations offering the most thermally efficient steel lintel solution on the market. UKLintels are the largest stockist of Catnic’s pioneering lintel and stock every cavity size and profile available.

Give It the Support It Needs!
Steel lintels are all built to withstand a specified safe operating load. If you don’t know how to calculate these weights or proportions you must seek advise from a qualified structural engineer or your builder prior to purchase. Alternatively, contact us, and a member of our sales team will be happy to assist you!
Folding doors used to mean cheap MDF panels that constantly jumped the track. But today’s bi-fold doors provide an elegant and functional way to make your living space more flexible.
Because the door panels fold and stack as the doors are opened, you can turn a wall into a large opening. But since this means the wall goes away, proper support across the top of the opening is crucial to hold the doors in place when closed and keep the roof from falling in when open.
The horizontal beam or lintel running across the top of the door jam provides that structural support. While the lintel can have some give or flex for standard doors and windows, it needs to maintain its straight line for bi-fold doors to function properly.
Let’s take a look at what makes a lintel for a bi-fold door different and how to choose the proper one.
Types of Lintels
Lintels are found above all the doors and windows of a house, with different types called for depending on the size of the opening and the amount of load. They hold up the upper floors and roof where there is no wall to do so.
Here’s a quick look at your choices:
- Stone – used for openings up to 2m wide
- Brick – used for openings less than 1m wide with smaller loads
- Wood – usually found in older homes and used for openings with more length
- Reinforced concrete – appropriate for all loads and sizes
- Reinforced brick – used for heavy loads and openings at least 1m wide
- Steel – best for large openings that are subject to heavy loads
Which Lintel for Bi-fold Doors?
Normal structural loads in a building come from the roof trusses, exterior masonry, and floor joists. Your choice of lintel has to take into account the amount of load. For bi-fold doors, you have an additional load as the lintel has to be able to support the additional weight of the doors when they are closed.
Most exterior openings use lintels of concrete, wood, or steel. Because even a small bend can keep your doors from sliding open or shut. This is known as permissible deflection for lintels and most bi-fold door manufacturers would request that a lintel is installed with a maximum deflection of less than 5mm. A Lintel should not exceed a maximum vertical deflection of 0.003 x the effective span (effective span = distance between centre of bearings) when subjected to the safe working load (SWL). heavy-duty steel is recommended for bi-fold doors, especially for large openings.
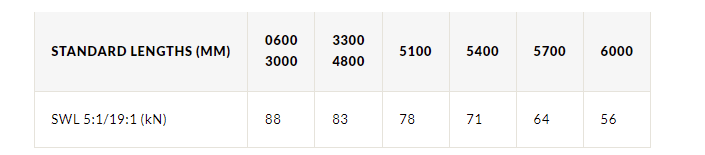
As a minimum we would recommend looking at our Extra Heavy Duty Range. In most circumstances we would recommend using our CXL Lintels (Extreme Load Lintel) (the links take you to a 50-65mm cavity lintel, please select the cavity size required from the dropdown box). CXL Extreme load lintels offer the minimum deflection in our lintel range. These are in stock up to 6.0m long in every cavity size (50,60,70,90,110,130,150mm).
Below is a table of loadings that these lintels can achieve. To achieve the loading figures shown, the lintel must be laterally restrained and have 200mm end bearing supports and inner to outer load ratios between 5:1 and 19:1. Please consult a structural engineer to check the product suitability and deflection for your project prior to ordering.
Structural Considerations
Bi-fold doors add dramatic flair to your space along with flexibility. Added to an exterior wall, these doors can extend a living room into the patio. Added to an internal wall, they allow separate rooms to turn into a single larger space when needed.
But adding a bi-fold door requires more considerations than a standard opening. The installation has to take into account the thickness of the walls and the size of the opening. Your choice of lintel must also consider the weight of the door, the type of masonry above the door, and how much masonry is on either side of the opening. Loading ratios should also be taken into consideration. Safe working loads (SWL) as defined by BS 5977:Part 2: 1983 for cavity wall lintels refer to uniform distributed loads applied in the inner to outer leaf ratios:
- 1:1 for lintels supporting masonry only
- 3:1 for lintels normally carrying timber floors
- 5:1 for lintels normally carrying concrete floors
- 19:1 for lintels normally carrying non standard or unusual load conditions.
Your choice of a door should also be taken into consideration. Top-running doors put more load on the lintel than bottom-running doors, which get more support from the floor.
For this reason, there can be a lot of math involved in choosing the right type and size for your new bi-fold door, which is where a structural engineer comes in. The larger the size or the more the new door will vary from the old, the more helpful it can be to have a professional work with you to ensure you have adequate structural support.
Size, load, and movement have the most impact on choice and installation. Size is simply figured by measuring the size of your opening and adding at least 150mm to each end for support (200mm for CXL profiles). Going beyond that delivers extra cost more than it does extra support.
Lintel Installation
Whether you plan to replace an existing door or add in a new feature, installation starts by calculating how much support your doors will need. A steel lintel is a safe bet to handle the weight of your door and the load of the above structure.
Bi-fold doors can be placed on an interior or exterior wall and even added to a load-bearing wall. Opening up a load-bearing wall to add a door can weaken it as there is less to support the weight of the upstairs floors and the roof. A rolled steel lintel can provide the extra support that ensures the wall won’t collapse under the weight.
Proper installation should involve bedding the lintel in the mortar and placed perfectly level. Both are important to ensure the load is evenly distributed. Mortar should be cured adequately to ensure the load is transferred through the lintel to the walls on either side of the door.
Installing a Bi-fold Door?
Bi-fold doors open your home to more light and add flexibility to your interior layout. Installing them requires adding a lintel across the top to provide structure to the opening and support the weight of the doors. For bi-fold doors, steel lintels make your best option as they have the strength for the job.
If you’re adding bi-fold doors for a client, contact us for a quotation. We offer the UK’s largest steel lintel range with fast track and next-day delivery nationwide.
Please always consult a structural engineer to check any product suitability prior to purchasing from our website as some items are non-returnable once purchased. A lack of due-diligence can result in an expensive mistake. We always recommend full due-diligence is taken prior to ordering.
We’ve been using lintels in the UK for thousands of years. You only need to take a trip to Stonehenge to see a perfect example of post-and-lintel construction that dates back as far as 2500 BC.
Today lintels are still an integral part of our buildings and homes.
When installing a lintel, you need to be sure that it’s done right. If not, it can lead to serious complications.
If you want to know how to start installing a lintel, read on as we look at the basic steps involved.
What Is a Lintel?
A lintel is a beam that is used above the openings for doors or windows in order to support the weight of the structure above.
Without a lintel, the entire load of the brickwork about a door or window would have to be carried by the window or door frame itself. A lintel spreads that load into the masonry on either side of the door or window, ensuring that door and window frames aren’t placed under undue pressure.
A lintel must be properly installed in order to function correctly.
Steps to installing a Lintel
Proper lintel installation requires numerous steps. We’ll take a look at some of the basics below.
1. Minimum End Bearing
In order for a lintel to provide the correct support, it needs to extend far enough onto the brickwork at the side of the door or window.
The lintel should normally extend a minimum of 150mm beyond the opening on either side although down to 100mm is permissible under certain circumstances (check with the supplier or manufacturer if you need a reduced bearing). It’s not advisable to extend too far beyond this as you’ll be paying for more than you need.
2. Bedded on Mortar
You must bed your lintel on mortar.
By installing a lintel on a bed of mortar, it ensures that the loads are evenly distributed. The thickness of the mortar should be sufficient to accommodate any unevenness that there might be between the lintel and the support.
The lintel should be bedded on both leaves to ensure that load is spread symmetrically.
3. Make Sure the Lintel is Level
Once you’ve placed the lintel on the bed of mortar, you need to ensure that it’s perfectly level. If the lintel isn’t level, the load will not be evenly distributed and may place undue stress on parts of the supporting walls.
Use a spirit level to ensure that lintel is placed perfectly horizontally across the opening. You’ll also need to confirm that the lintel is level cross-wise too; in other words, you should confirm that neither leaf is higher than the other. If this is the case, it will put undue pressure on one of the leaves.
4. Allow Mortar to Cure Before Applying Loads
Once your lintel is level, you’ll need to allow the mortar to cure before applying any loads.
Until the mortar is completely cured, the load won’t be correctly transferred through the lintel and into the masonry on either side of the opening. If you’re in a rush and can’t wait for the mortar to cure, then you must ensure you place appropriate supports beneath the lintel before applying any loads.
5. Lay Bricks on Both Sides
Once the mortar is dry, or you have supports in place, you can start laying bricks.
You must ensure that you lay bricks on both sides simultaneously so that the load on each leaf does not get too far out of balance. In other words, once you’ve laid one or two rows of bricks on one side, you should stop and lay the same amount on the other side. You’ll need to repeat this process to ensure that the load is always the same or similar on each leaf.
If you put too much load on one side at once, you may damage the lintel or have an even worse problem. Don’t take the risk and always keep the loads on each leaf balanced.
6. Install a Damp Proof Course if Necessary
If the lintel is being installed as part of a cavity wall, then you should install a damp proof course.
Cavity walls are designed such that the outer leaf is intended to be damp, and the inner leaf dry, with the cavity ensuring that this remains the case. That’s why anything that bridges this cavity—such as a lintel—should be installed such that moisture doesn’t track between the two.
BS 8215 states that DPCs in masonry buildings should have a minimal fall of 150mm. This should be sufficient to prevent any moisture tracking inwards.
7. Propping Lintels
Some lintels will need to be propped until the mortar in the supported masonry has cured. This will normally be the case for “channel” lintels (those with a “C” shaped portion to one or both leaves) where the masonry built into the channel contributes to the strength of the lintel.
Where this is the case, the manufacturer will normally provide guidance in the form of a label applied to the lintel or give guidance within their technical literature. Please always check prior to installation if you are unsure.
Whilst not required, propping can also be beneficial for other lintels. Allowing the mortar to cure whilst propped will reduce the deflection of the lintel, which could be particularly noticeable for longer openings.
Key takeaways and guideance on installing a Lintel
Installation should always be in line with the manufacturer’s guidelines. If you are in doubt as to the structural performance or suitability of a lintel then please contact the manufacturers technical department before ordering/installation.
- Each lintel is different but most steel lintels should be propped at 1.2m ctrs and not removed until the mortar has cured.
- Minimum recommended end bearing = 150mm. The lintel should be bedded on mortar and levelled both along the lintel and across its width. Full bricks, blocks or padstonesshould be used as bearing areas. Do not bear onto cut blocks.
- All external wall lintels MUST be installed with a flexible damp proof course (DPC) or cavity tray. In the case of cavity walls the cavity tray should extend not less than 50mm beyond the cavity return.
- Inner and outer leaves supported by lintels should be raised together to avoid excessive eccentricity of loading.
- Masonry must not overhand any flange by more than 25mm.
- Masonry above the lintel should be allowed to cure before applying floor or roof loads.
Further guidance can be found in the manufacturer’s literature at Catnic or Stressline.
Are You Looking for High-Quality Lintels?
If you’re looking to purchase Stressline galvanized or Catnic lintels, then you’re in the right place.
We offer a wide range of products, with every cavity size in standard duty, heavy-duty, and extra-heavy-duty profiles. If you’re looking for an extreme load lintel, we’ve got you covered too. We are the only UK stockist to carry a full range of extreme load lintels from all the major brands.
Check out our range of products today.