


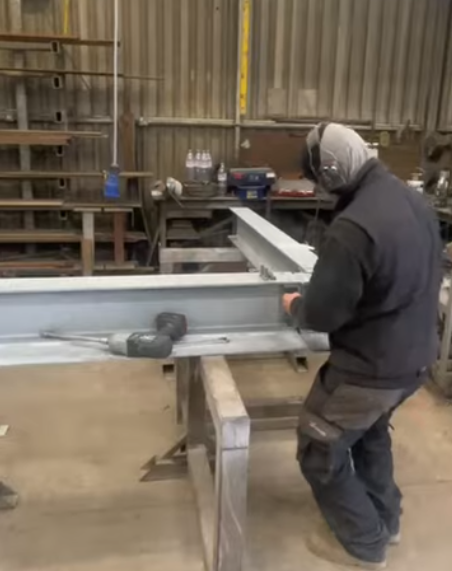
We often get asked how to assemble our Special Corner Lintels so we’ve put together this step-by-step video to guide you through the process. See how it bolts together in minutes – just 4 bolts for the corner, 2 bolts for the post! We also offer bay lintels which follow the same process.
This video will walk you through each stage, ensuring a secure installation! Watch to see how it’s done, and if you have any questions, feel free to get in touch with us!
Click on the image below to see How to install a Corner Lintel
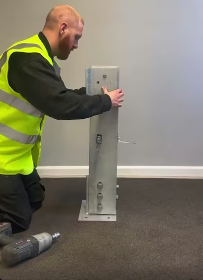
We often get asked how to assemble our WP2 Windpost, so we’ve put together this step-by-step video to guide you through the process. This video will walk you through each stage of assembling a WP2 Windpost, ensuring a secure installation! Watch to see how it’s done, and if you have any questions, feel free to get in touch with us! We also supply a PDF install guide in the box when ordering our Windposts.
Click on the image to below to see How to install a WP2 Windpost
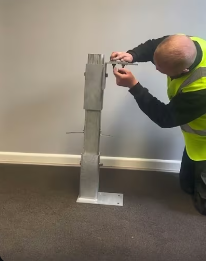
We often get asked how to assemble our WP3 Windpost, so we’ve put together this step-by-step video to guide you through the process. This video will walk you through each stage of assembling a WP3 Windpost, ensuring a secure installation! Watch to see how it’s done, and if you have any questions, feel free to get in touch with us! We also supply a PDF install guide in the box when ordering our Windposts.
Click on the image below to see How to install a WP3 Windpost
How to use our new ‘My Account’
Firstly, log in to your existing account or create a login for your new account.
Once you are logged in, you will see there are now many new features to help you and make it easier to access your current/previous orders with us.
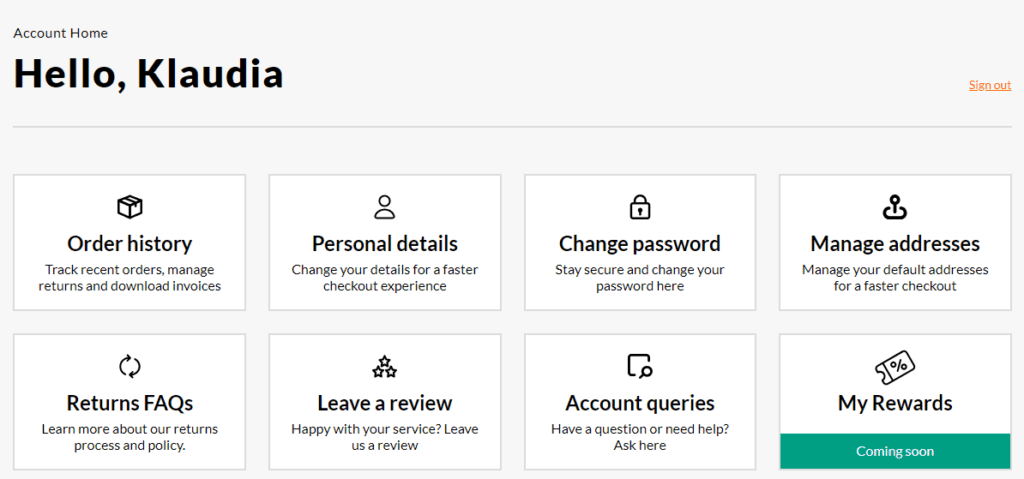
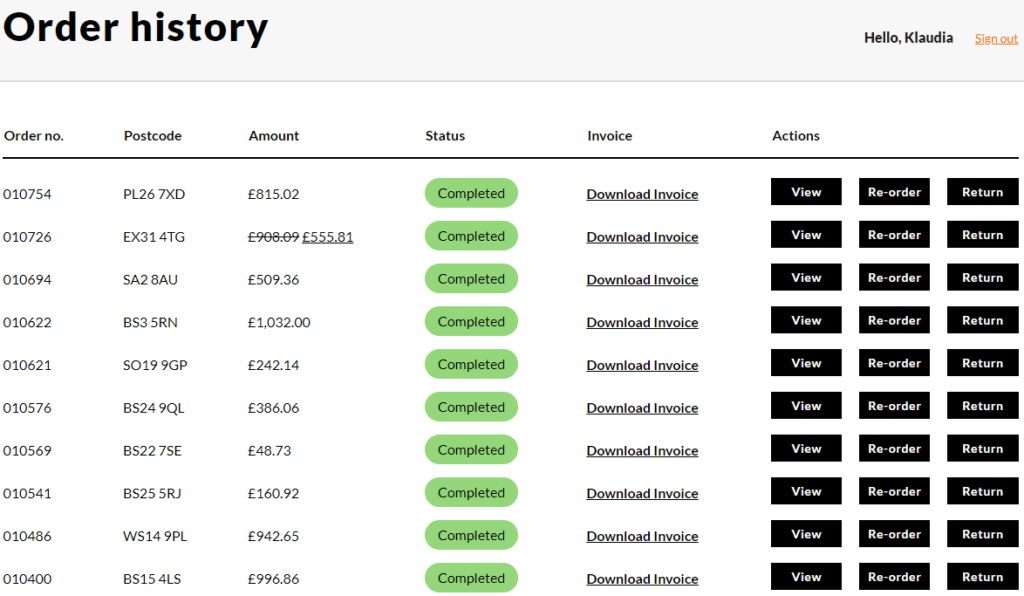
To access and interact with all your past/current orders, click into the first box “Order History”, this will display all your orders placed with us.
You can download your invoice for any order, request a return, re-order any past orders you need, view the status of your orders from ‘Processing’ all the way up to ‘Completed’ or simply just view any order.
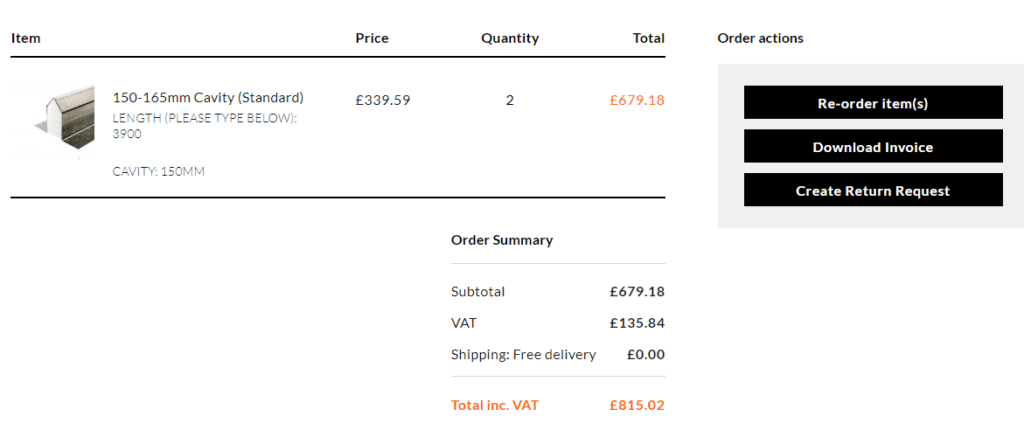
If you click into ‘View’ you will see the items you have ordered, all the past messages we have sent you regarding your order and also, the options to re-order or request a return on that page too.
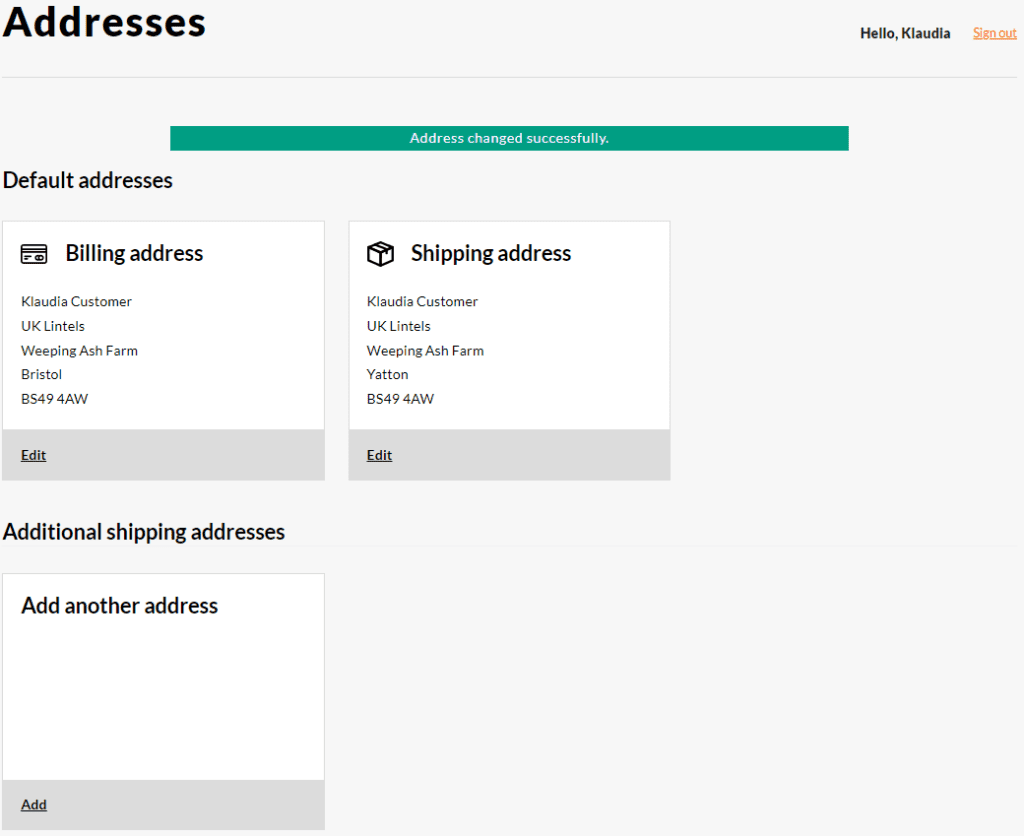
You can also click ‘Addresses’ and set a default shipping address or add more addresses for multiple projects! When checking out, you will be able to select these from a list to save you typing them out again at checkout.
We have also updated our Returns Frequently Asked Questions to save you taking your time to give us a call or emailing us. Alternatively, you can also click into your order history and request a return.

For any other queries, do not hesitate to contact us on 03330 169 789 or info@uklintels.com
You will get various types of windposts to fit the particular job you are doing. There are four general catagories of windpost. Within each catagory there will also be various sizes available. UKLintels offer their own system of each of these for your consideration and engineers approval prior to ordering online.
- WP2 or LP Windpost; Angle (L shape) system built within the inner leaf.
- WP3 or U Windpost; Channel (C Shape) system built within the cavity void.
- DU Windpost; Double Channel (C Shape) system built within the cavity void for heavier loading conditions.
- SHS Windpost; Box section system built within the inner leaf or cavity void.
Did you know? Shorter windpost for windows are often refered to as parapet posts.
WP2 – Angle (L shape) system built within the inner leaf of a cavity wall
WHAT IS A WP2 WINDPOST?
WP1 & WP3 – Channel (C Shape) system built within the cavity void leaving the brickwork undisturbed.
WHAT IS A WP3 WINDPOST?
DU – Double WP3 (welded or bolted back to back) installed within the cavity between your brickwork inner and outer leaf leaving the brickwork undisturbed.
WHAT IS A DU WINDPOST?
Visit our Windpost Superstore now to build and order online any of the above Windposts.
SHS – A box section (Square Hollow Section) installed within the inner leaf or within the cavity void.
WHAT IS AN SHS WINDPOST?
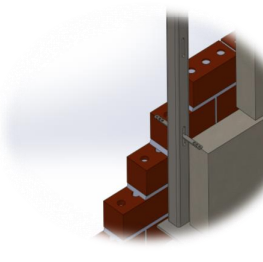
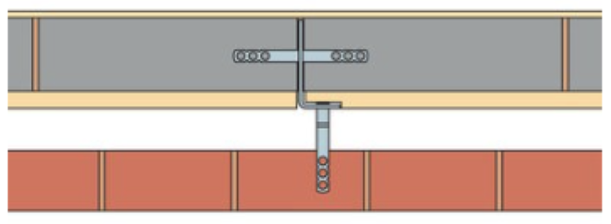
WP2 Windposts – An angle system that sits within the inner leaf brickwork and is tied to the inner leaf with 100mm long wall ties. The angle is also tied to the outer leaf brickwork with longer wall ties. The angle is fixed at the base and top with brackets and cleats.
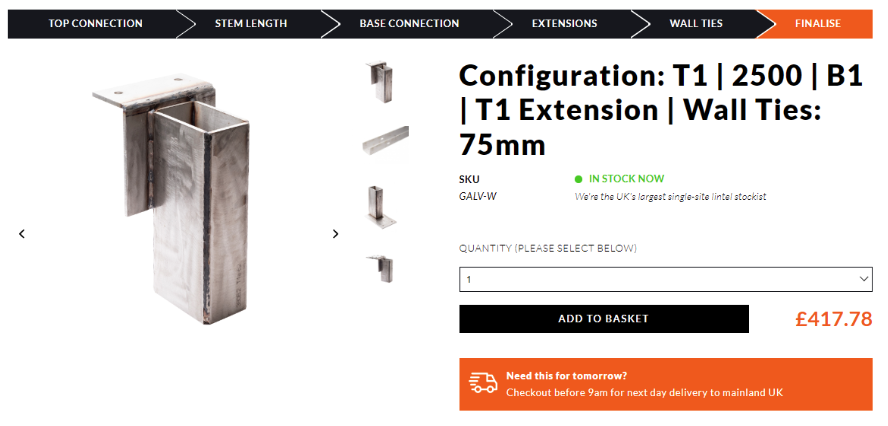
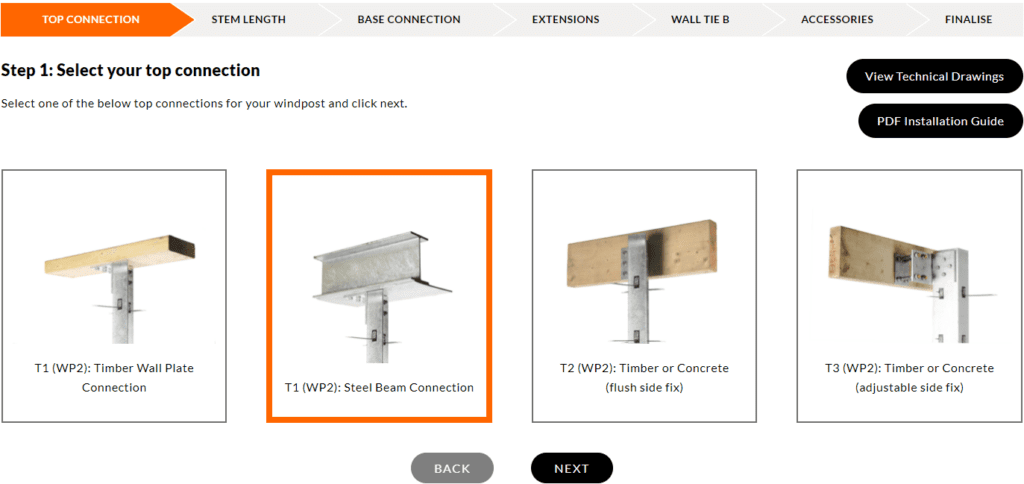
You can CONFIGURE ONLINE a WP2 windpost (150x90x10) section. Below is an explanation of how to use our online configurator with various tips for each stage.
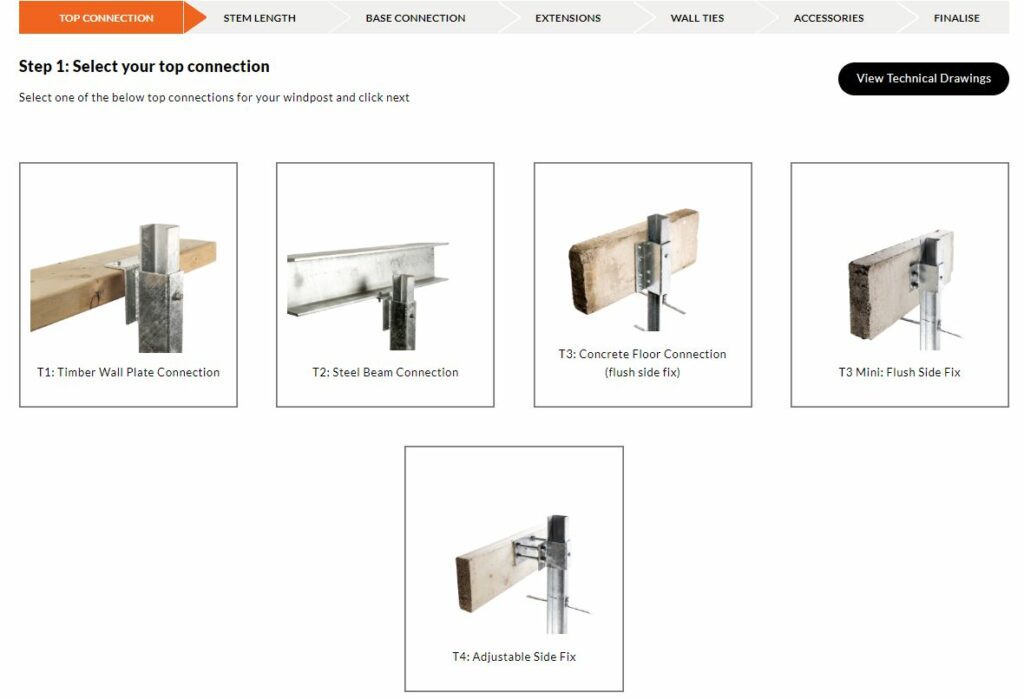
The top connection will be a choice of fitting to attach to Timber, Steel or Concrete beam. You may also download our PDF Installation guide.
Below shows in one easy to see table Ancon WP2 | IG LP & Expamet L0 Section Windposts. It also shows the UKLintels system within this range of products. This table should be used as a guide only. Please check this table against the manufacturers latest published data for accuracy.

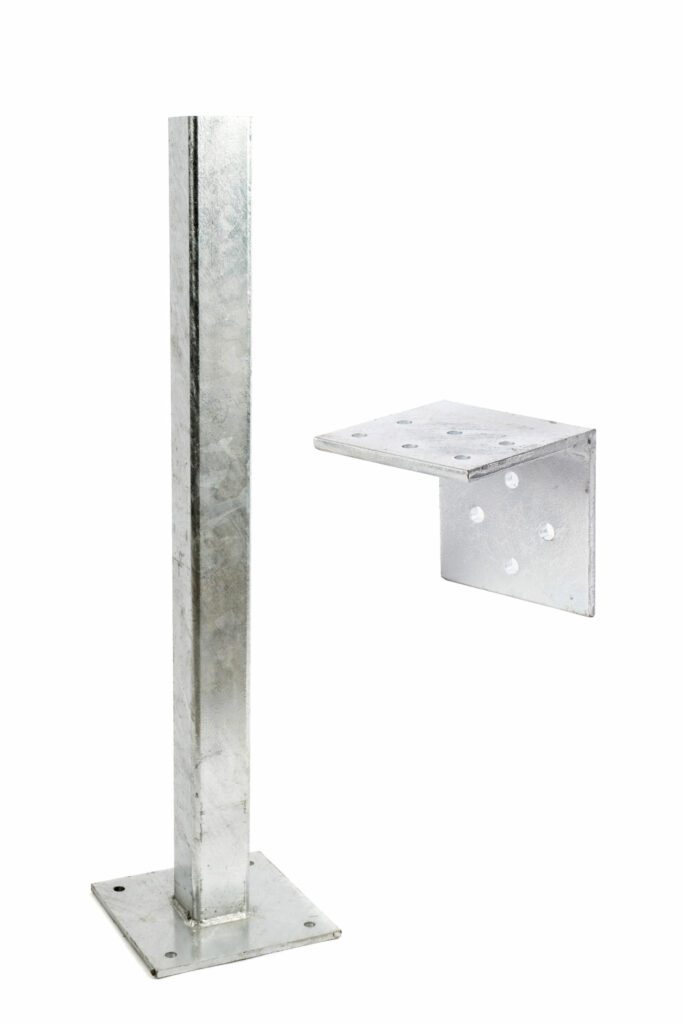
Step 1 – Select your top connection bracket. Once the top bracket is fixed in to place, the remaining stem can either be built in to your inner skin, or cut off on site with a disc cutter and the cut end treated with cold zinc spray which can be purchased online. The various options are shown on screen and click NEXT once you have made your selection.
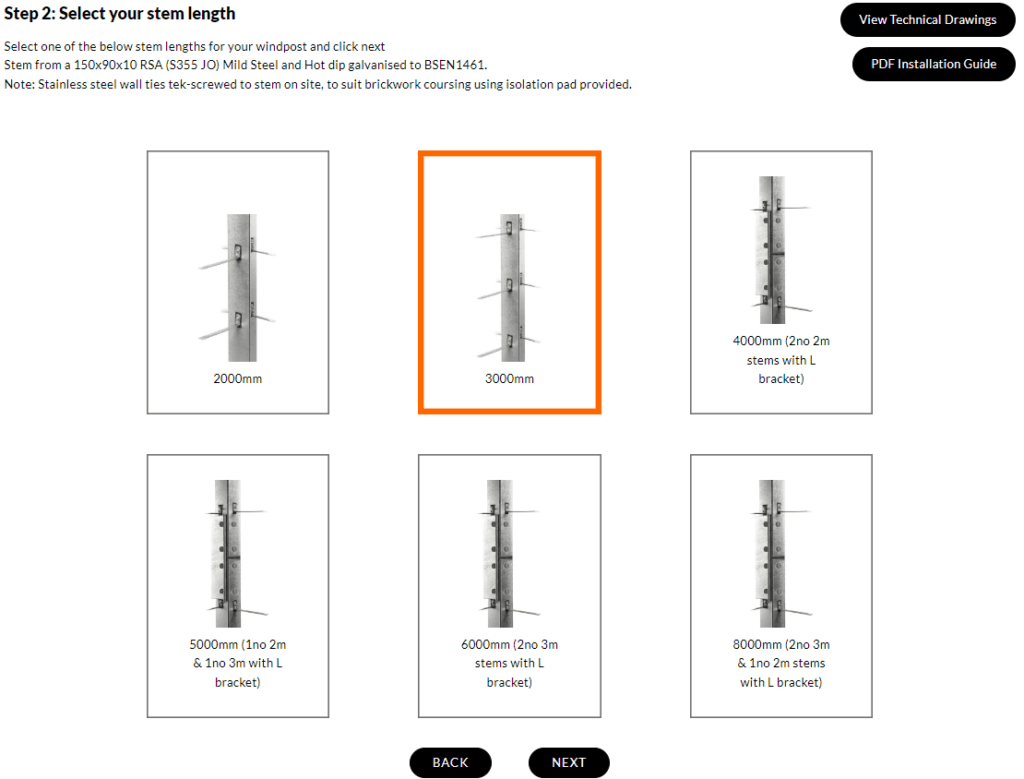
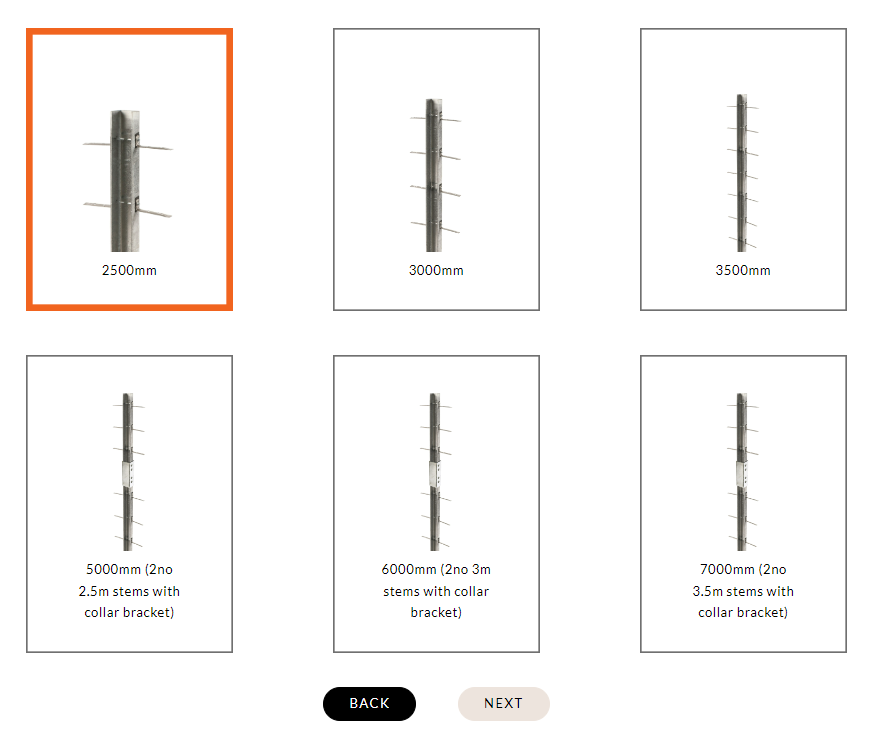
Step 2 – You will decide on the length of the stem you will need. 2m to 3m stems come as one piece. Whereas, 4.0m+ options are two or three stems with a collar bracket connections. The collar bracket and bolts are supplied as part of the kit when you select these lengths and the stems are pre-dilled by UKLintels before delivery.
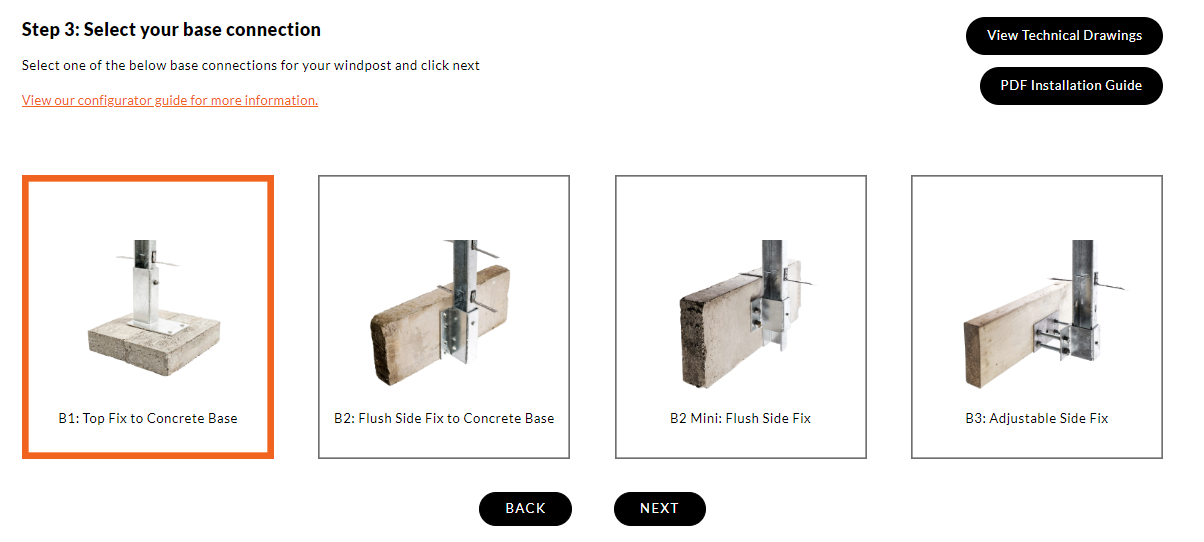
Step 3 – select your base connection. WP2 windposts are built within the inner wall and therefore the WP2 system has only one base connection offering. Select the below base connections for your windpost and click next. The below sketch shows the stem installed to a 100mm wide inner skin. The baseplate will sit within the cavity as shown.


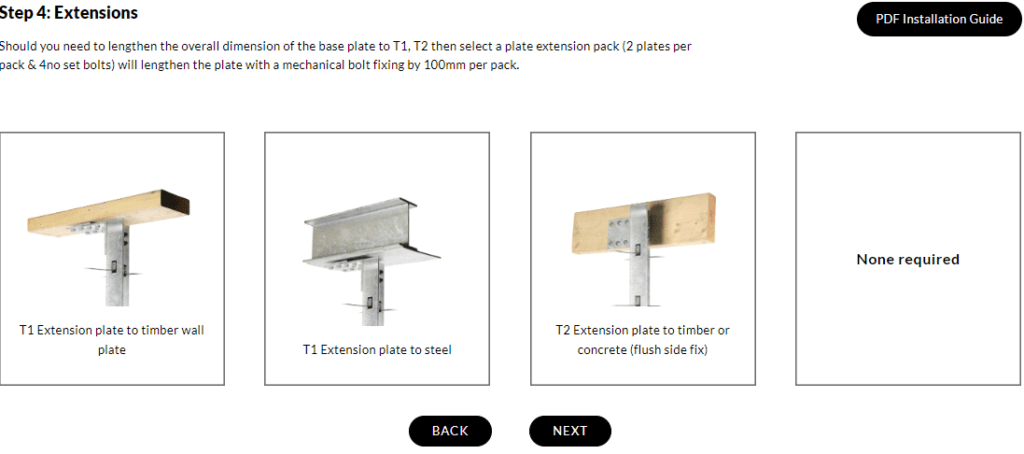
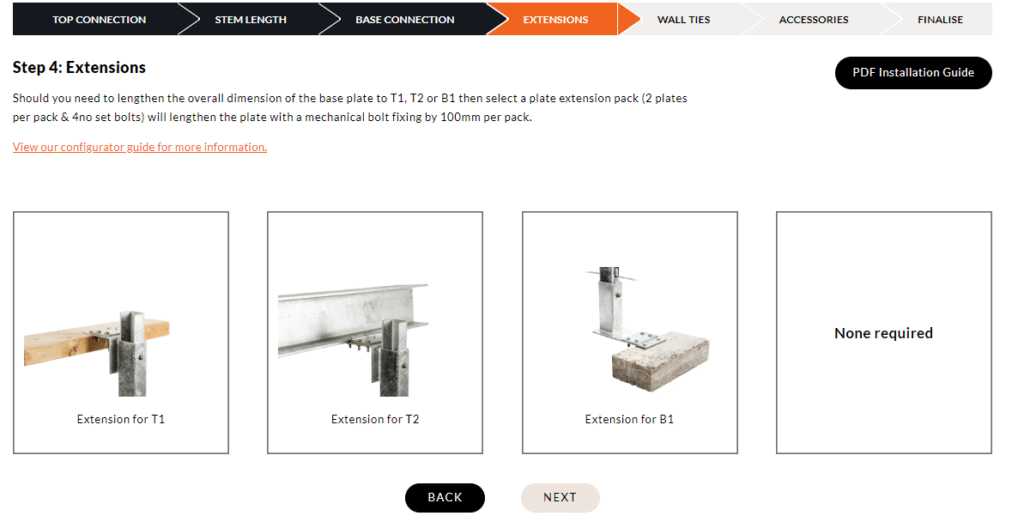
Step 4 – Various extension plates are also available to suit your specific project. This is because you may wish to have a longer plate for your top connection cleat than our standard 150mm long T1 & T2. Should you need to lengthen the overall dimension of the plate length to T1, T2 then select a plate extension pack (2 plates per pack & 4no set bolts) will lengthen the plate with a mechanical bolt fixing by 100mm per pack. You can have as many packs as you like!
Step 5 – All windpost require tying into the inner and outer wall with the use of wall ties. We recommend that a wall tie pack is added to your configuration as we supply the stainless steel wall tie, tek-screw/washer and an isolation pad to debond the stainless steel tie from the galvanized stem to prohibit cross contamination of materials.
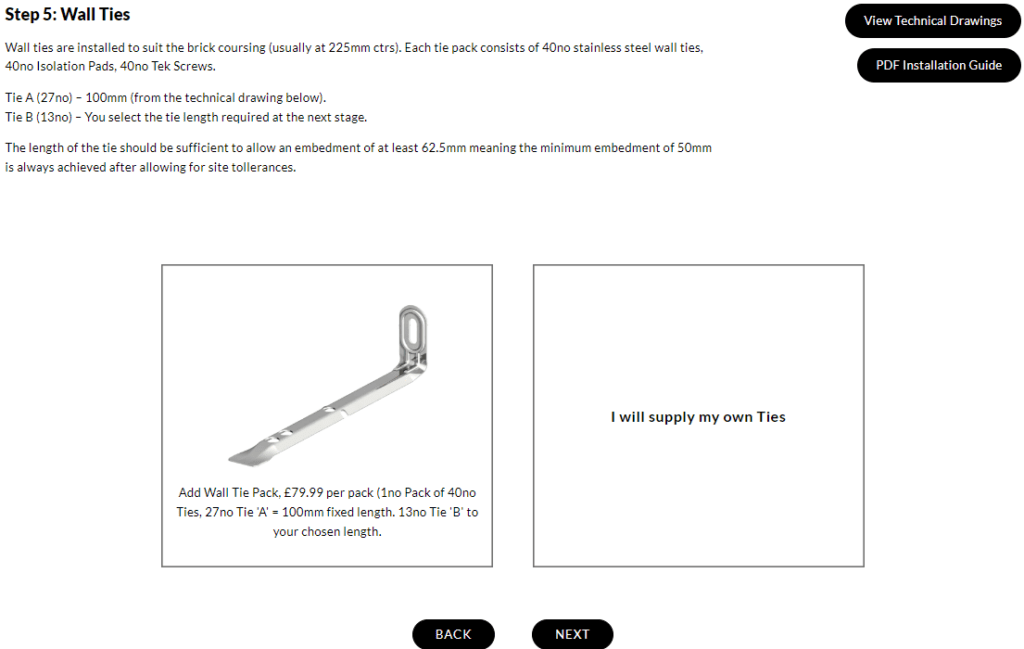
Wall Ties are installed to suit the brick coursing (usually at 225mm ctrs). Each tie pack consists of 27no ties at 100mm and 13no of your own choice, 40no Isolation Pads, 40no Tek Screws. You can select the Tie B length required using the options online from 75mm to 200mm tie lengths.
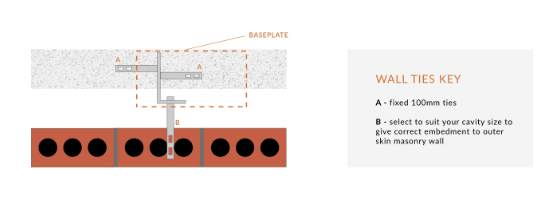
Unlike the image below our stems are not pre-slotted for your ties. This gives far more flexibility on site with your brick coursing. The overall sketch below gives a generic example of how a WP2 may be installed within a cavity wall with a base fixing and top cleat fixing to timber (side fix connection). The wall ties through the slots would be to tie in the inner leaf and you can see the wall ties fixed to the angle face to tie in the outer leaf masonry wall.
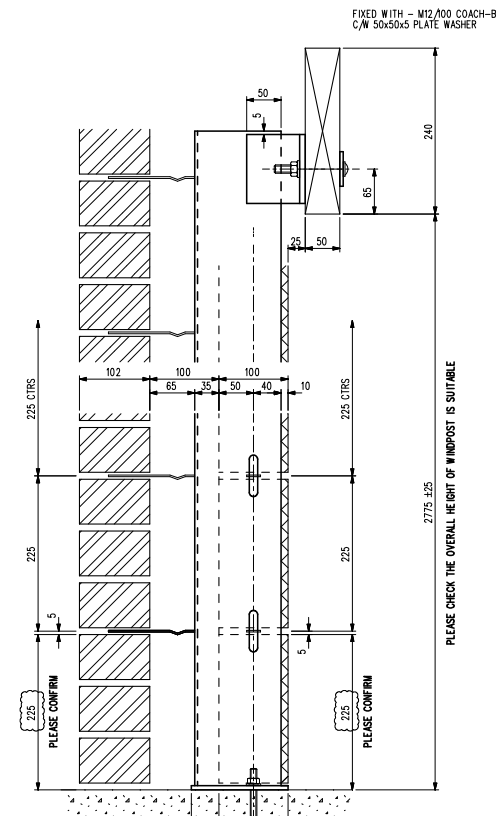
The length of Tie B should be sufficient to allow an embedment of at least 62.5mm meaning the minimum embedment of 50mm is always achieved after allowing for site tolerances. The tie length will depend on the overall cavity size, and the position of the windpost within the inner wall (and the inner wall thickness). Should you require a tie pack with one side longer than the other as shown below, then you can order a mixed ties pack. You can also buy online additional tie pack and other accessory components.
CONGRATS – You have now build your windpost, you can amend the quantity and add to basket.
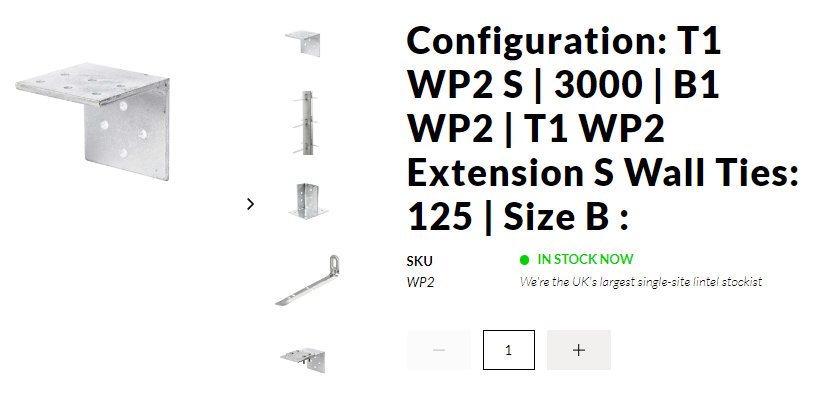
Visit your basket to review your order. You can click on CALCULATE MY SHIPPING to review all collection and delivery options from our Premium Next Day, Fast Track, Standard or Free Delivery (up to 10 days) shipping. Alternatively, you can also Click & Collect from us!
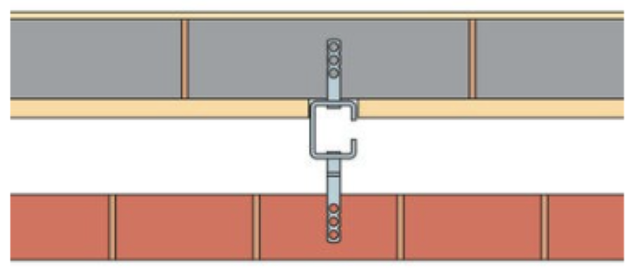
WP3 Windposts – A channel system that sits within the cavity tying the inner and outer wall with wall ties, fixed at the base and top with brackets and cleats.
How does a UKLintels WP3 Windpost differ from Ancon | IG or Expamet (Birtley) Section Windpost?
Below shows in one easy to see table Ancon WP3 | IG U & Expamet U Section Windposts. It also shows the UKLintels system within this range of products. This table should be used as a guide only. Please check this table against the manufacturers latest published data for accuracy.

You can CONFIGURE ONLINE a WP3 windpost (85x60x6) section. Below is an explanation of how to use our online configurator with various tips for each stage.
The top connection will be a choice of fitting to attach to a timber, steel, or concrete beam. You can also download our PDF Installation guide.
Step 1 select your top connection bracket. The top brackets are open brackets so the top connection bracket can slide up and down the windpost. Once the top bracket is fixed in to place, the remaining stem can either be left sailing in to the cavity, or cut off on site with a disc cutter and the cut end treated with cold zinc spray which can be purchased online. The various options are shown on screen and click NEXT once you have made your selection.
Step 2 you will decide on the length of the stem you will need. 2.5m – 3.5m stems come as one piece. 5.0m + options are two stems with a collar bracket connection. The collar bracket and bolts are supplied as part of the kit when you select these lengths and the stems are pre-dilled by UKLintels before delivery.
Step 3 – select your base connection. The stem is pre-drilled with a slotted hole to allow for adjustment. The base bracket bolts to the stem.
Step 4 – Various extension plates are also available to suit your specific project. This is because cavity wall sizes change with various cavity sizes, inner and outer leaf widths. Typical walls can be anything from 250mm overall (100mm inner leaf, 50mm cavity, 100mm outer leaf) to 405mm. In addition, the position of the windpost within the cavity can sometimes be central or more towards one side (often closer to the inner leaf).
The standard baseplate on our top and bottom brackets therefore sometimes need to be extended to allow for these variations.The extension plates enable this via mechanically fixing additional plates to the existing bracket. Each extension plate consists of two plates and 4 bolts and extend the bracket by 100mm as shown below.
Step 5 – All windpost require tying into the inner and outer wall with the use of wall ties. We recommend that a wall tie pack is added to your configuration as we supply the stainless steel wall tie, tek-screw/ washer and an isolation pad to debond the stainless steel tie from the galvanized stem to prohibit cross contamination of materials.
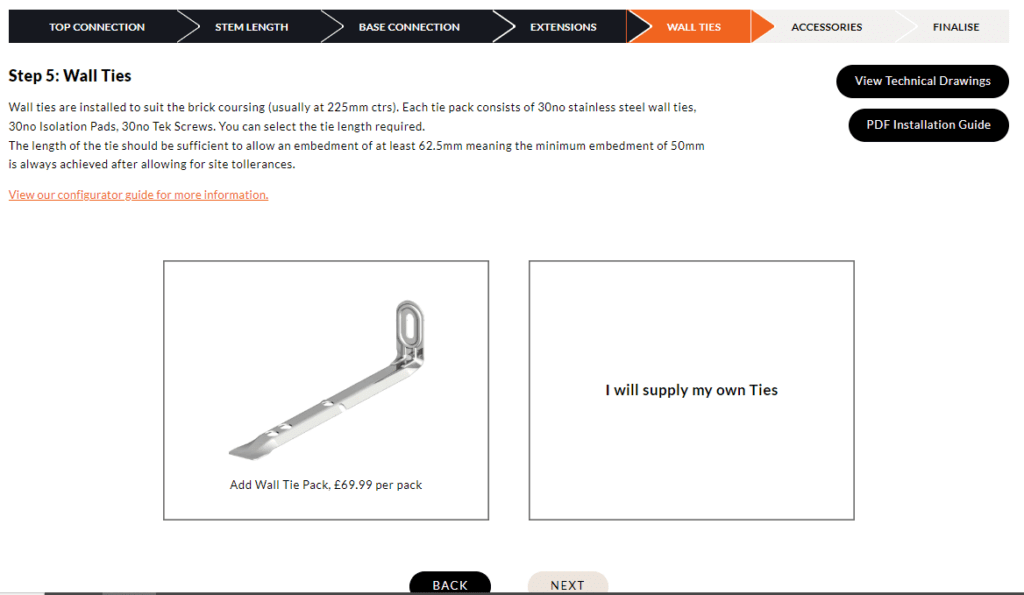
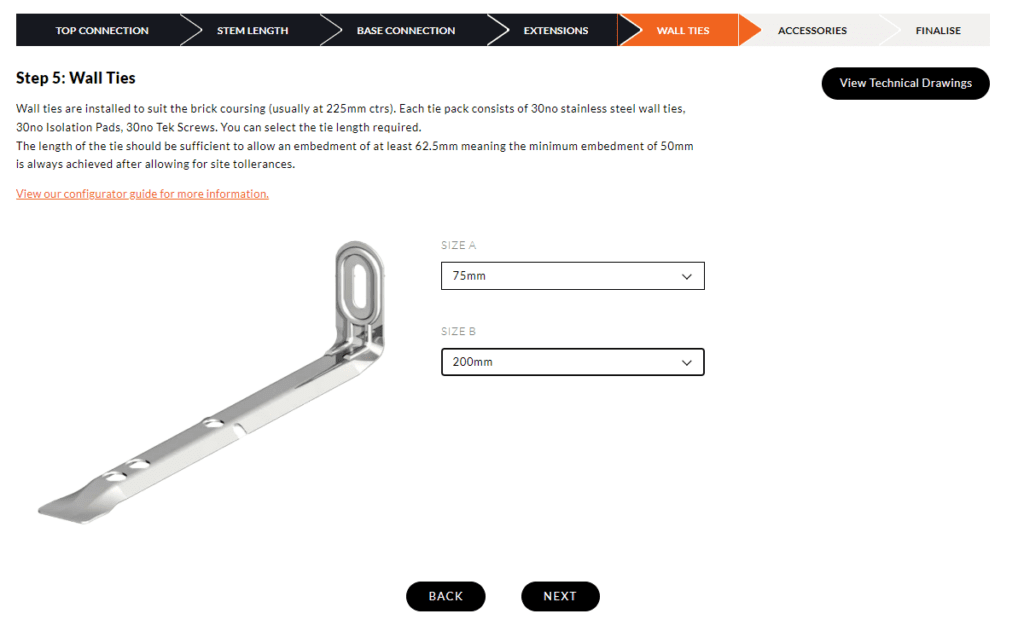
Wall ties are installed to suit the brick coursing (usually at 225mm ctrs). Each tie pack consists of 30no stainless steel wall ties, 30no Isolation Pads, 30no Tek Screws. You can select the tie length required using the options online from 75mm to 200mm tie lengths.
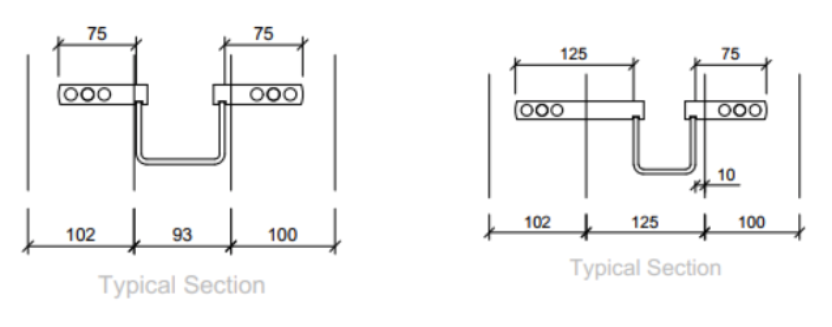
The length of the tie should be sufficient to allow an embedment of at least 62.5mm meaning the minimum embedment of 50mm is always achieved after allowing for site tolerances. The tie length will depend on the overall cavity size, and the position of the windpost within the cavity. Should you require a tie pack with one side longer than the other as shown below, then you can order a mixed ties pack. You can also buy online additional tie pack and other accessory components.
CONGRATS – You have now built your windpost – amend the qty required and add to basket.
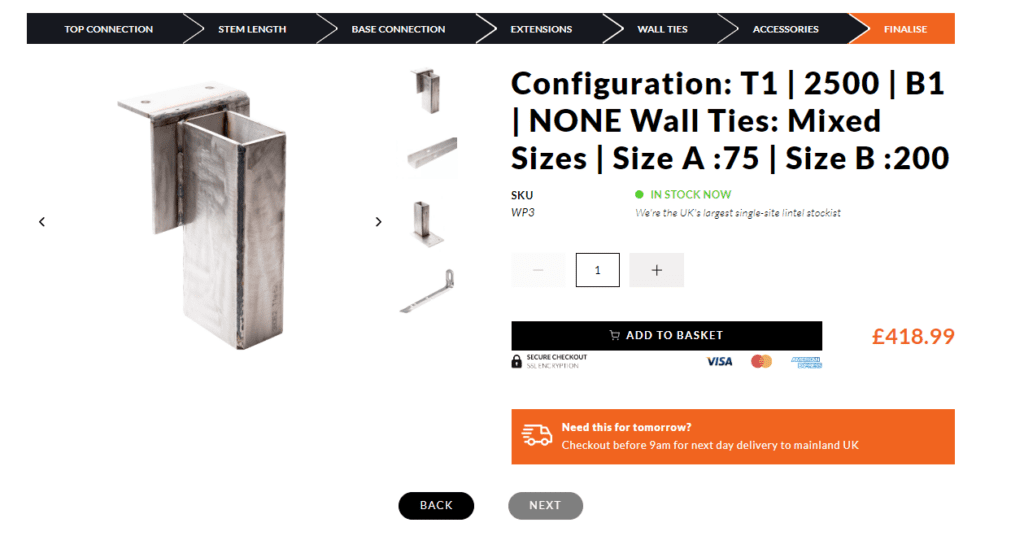
Visit your basket to review your order. You can click on CALCULATE MY SHIPPING to review all collection and delivery options from our premium next day, to free up to 10 day shipping.


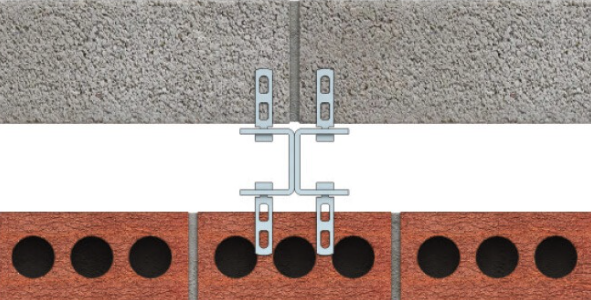
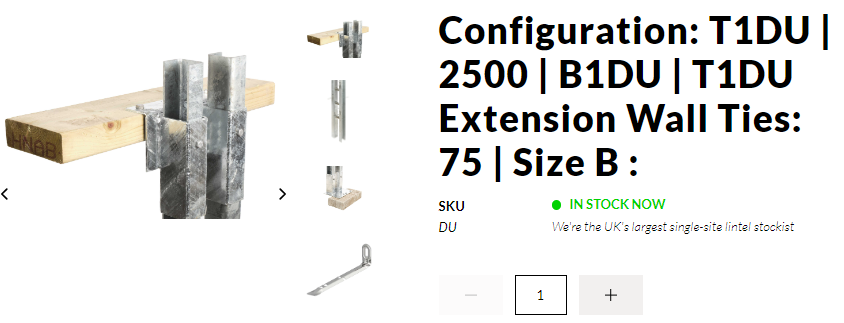
DU Windpost – A double channel system built within the cavity. DU windposts are a heavier duty variant of the WP3 Windpost. Comprised of a ‘back-to-back’ channel section engineered for heavier loading conditions.
You can CONFIGURE ONLINE a DU windpost which is 2no (85x60x6) C channel sections. Below is an explanation of how to use our online configurator with various tips for each stage.
The top connection will be a choice of fitting to attach to a timber, steel, or concrete beam. You can also download our PDF Installation guide.
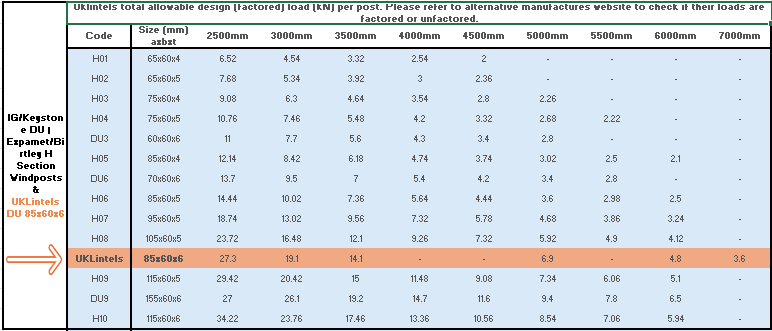
Below shows in one easy to see table IG/Keystone DU & Expamet/Birtley H Section Windposts. It also shows the UKLintels system within this range of products. This table should be used as a guide only. Please check this table against the manufacturers latest published data for accuracy.
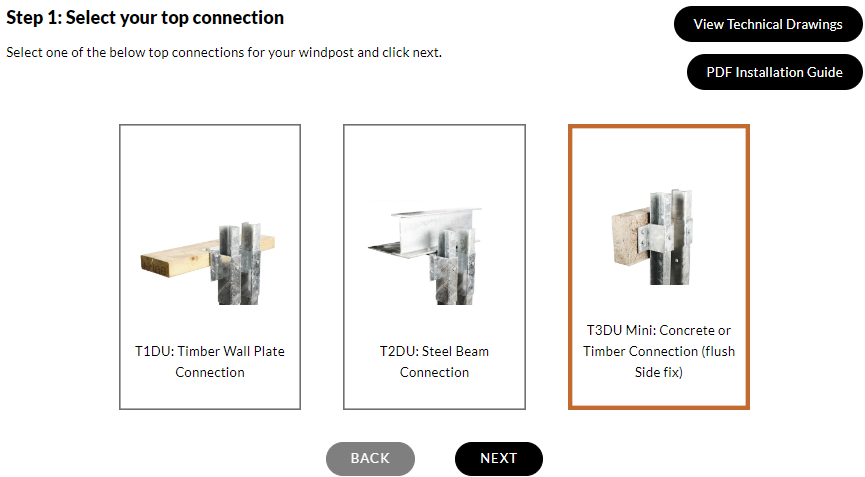
Step 1 – select your top connection bracket. The top brackets are open brackets so the top connection bracket can slide up and down the windpost. Once the top bracket is fixed in to place, the remaining stem can either be left sailing in to the cavity, or cut off on site with a disc cutter and the cut end treated with cold zinc spray which can be purchased online. The various options are shown on screen and click NEXT once you have made your selection.
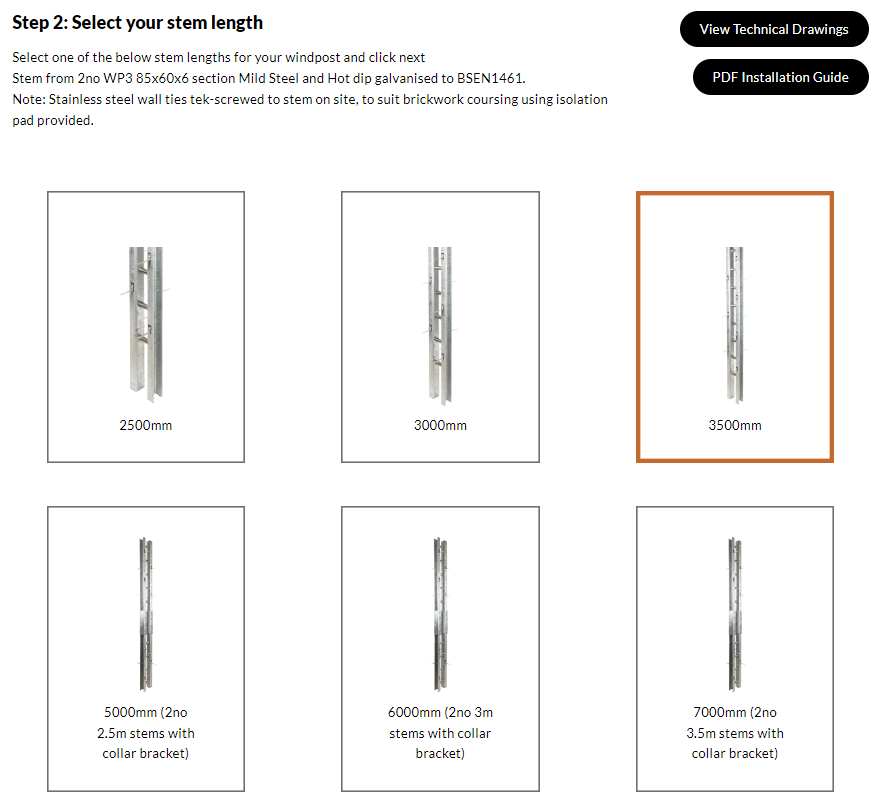
Step 2 – you will decide on the length of the stem you will need. 2.5m – 3.5m stems come as one piece. 5.0m + options are two stems with a collar bracket connection. The collar bracket and bolts are supplied as part of the kit when you select these lengths and the stems are pre-dilled by UKLintels before delivery.
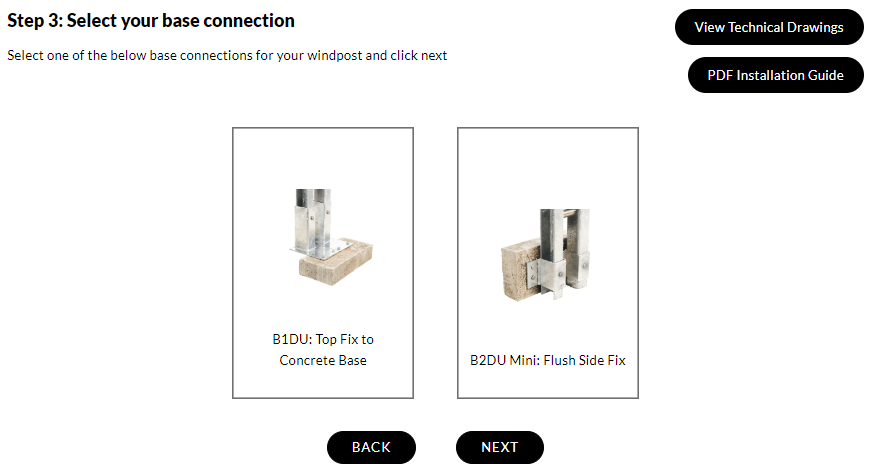
Step 3 – select your base connection. The stem is pre-drilled with a slotted hole to allow for adjustment. The base bracket bolts to the stem.
Step 4 – Various extension plates are also available to suit your specific project. This is because cavity wall sizes change with various cavity sizes, inner and outer leaf widths. Typical walls can be anything from 250mm overall (100mm inner leaf, 50mm cavity, 100mm outer leaf) to 405mm. In addition, the position of the windpost within the cavity can sometimes be central or more towards one side (often closer to the inner leaf).
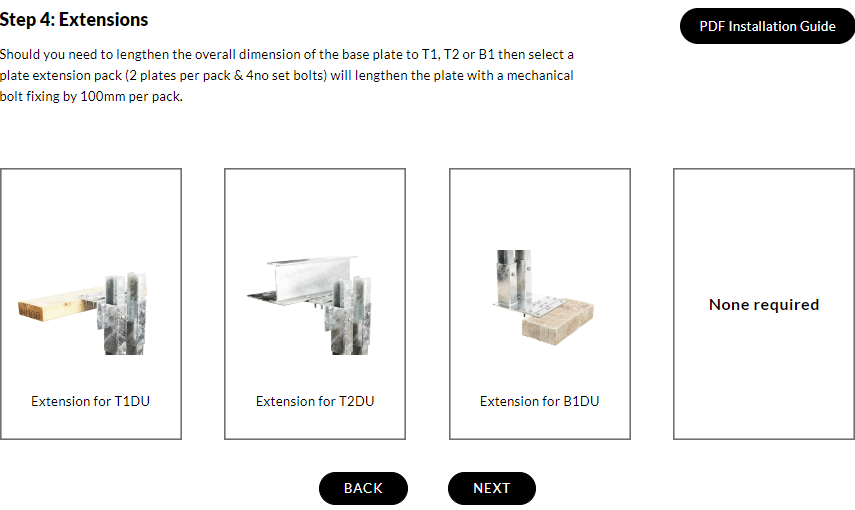
The standard baseplate on our top and bottom brackets therefore sometimes need to be extended to allow for these variations.The extension plates enable this via mechanically fixing additional plates to the existing bracket. Each extension plate consists of two plates and 4 bolts and extend the bracket by 100mm as shown below.
Step 5 – All windpost require tying into the inner and outer wall with the use of wall ties. We recommend that a wall tie pack is added to your configuration as we supply the stainless steel wall tie, tek-screw/ washer and an isolation pad to debond the stainless steel tie from the galvanized stem to prohibit cross contamination of materials.
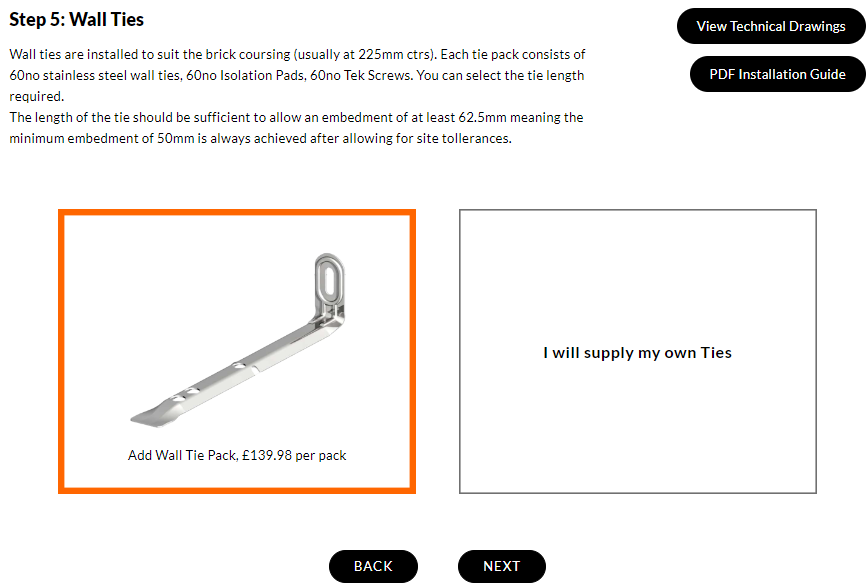
Wall ties are installed to suit the brick coursing (usually at 225mm ctrs). Each tie pack consists of 60no stainless steel wall ties, 60no Isolation Pads, 60no Tek Screws. You can select the tie length required using the options online from 75mm to 200mm tie lengths.
The length of the tie should be sufficient to allow an embedment of at least 62.5mm meaning the minimum embedment of 50mm is always achieved after allowing for site tolerances. The tie length will depend on the overall cavity size, and the position of the windpost within the cavity. Should you require a tie pack with one side longer than the other as shown below, then you can order a mixed ties pack. You can also buy online additional tie pack and other accessory components.

You have now created your windpost! You can adjust the quantity and add it to the basket.
Visit your basket to review your order. You can click on CALCULATE MY SHIPPING to review all collection and delivery options from our Premium Next Day, Fast Track, Standard or Free Delivery (up to 10 days) shipping. Alternatively, you can also Click & Collect from us!
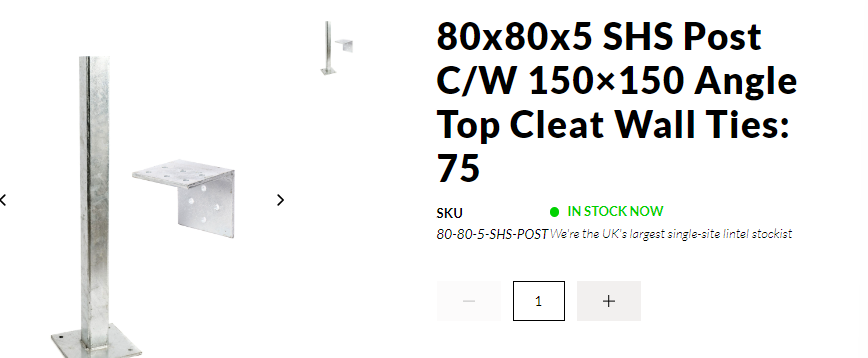
SHS Windpost – A box section (Square Hollow Section) built within the cavity or inner leaf tying the inner and outer wall with wall ties, fixed at the base with a welded baseplate and top with a loose top angle cleat.
You can CONFIGURE ONLINE a SHS windpost (80x80x5) section which is 3500mm in length and comes with a welded base plate (250x250x10). Below is an explanation of how to use our online configurator with various tips for each stage.

Step 1 – Select your post. For this windpost, there will only be 1 option to choose from. You may view our Techincal Drawings on our item page to see all details on this post.

Step 2 – Select your wall ties. We recommend that a wall tie pack is added to your configuration as we supply the stainless steel wall tie, tek-screw/ washer and an isolation pad to debond the stainless steel tie from the galvanized stem to prohibit cross contamination of materials.

Finalise – You have now build your SHS Post. Now just amend your quantity and add to basket!
Visit your basket to review your order. You can click on CALCULATE MY SHIPPING to review all collection and delivery options from our Premium Next Day, Fast Track, Standard or Free Delivery (up to 10 days) shipping. Alternatively, you can also Click & Collect from us!
So, you have found out that you need windposts. Unfortunately, you cannot just walk down to your local builders merchants and buy as many as you need. Unless you come to UKLintels Windpost Superstore!
Typically, windposts are bespoke items. You have to get an engineer or architect to assist you in specially designing the windposts you need for your construction project. A manufacturer can configure them to your specific needs but this process will involve issuing construction drawings for review and the manufacturer will provide a technical drawing for approval prior to manufacture. This process can be stressful for the client, and can take up to 4 weeks. Once approved, the manufacture time will be an additional 4 weeks making the whole process take months to receive your product.
Windpost design has advantages because you will know that you are getting a custom-fit product. However, this means a wait of several weeks to receive your product. It also doesn’t allow for errors during this technical phase where often the wrong stem length is provided making the delivered product useless and the process needs to be started again. The global supply chain crisis has made waiting times even longer and led to price increases in the construction industry.
Is there a faster way to receive Windposts?
Yes, order for Next day delivery from UKLintels Windpost Superstore
Some people find out they will need windposts when they have already begun building. The idea of losing time and money by waiting for months can be a massive headache.
A construction site can be an unpredictable place. You cannot always tell how long a project will take and what problems will crop up. Finding out you need a windpost can add to your stress, especially if it will take months to arrive. This can stall your project and cost you money.
Our unique windpost configurators provides a quick and easy solution to this dilemma for galvanized Windpost. Contact us for more information or try the online configurator today – BUILD NOW
You can buy three component parts separately, which will be put together at your building site.
The three parts you can order online are:
- The top connection
- The stem
- The base connection
- Accessory packs such as Wall Ties, additional or replacement brackets.
You will want to do this in close coordination with a structural engineer. Technical specifications and drawings are available to guide you and your builder. You will receive a product leaflet with tips for the installation of your windpost.
That’s it, next day delivery available.
Your windpost is built and can be added to basket (select the qty required) and delivered next day if required (various delivery options are available to select at basket/checkout).
Visit our Windpost Superstore now to build and order online.