


UKLintels are CE (UKCA) accredited for fabricated steelwork to BS EN 1090-1 to execution Class 2.
Did you know CE/UKCA Marking for fabricated constructional steelwork is a legal requirement? Don’t put yourself or your projects at risk. YOU are responsible as a purchaser of constructional steelwork to make sure the supplier you are using is CE (UKCA) compliant. Unfortunately, many small and medium sized steel fabricators still do not carry this accreditation putting many people at risk who purchase non-compliant constructional steelwork.
As of 1st July 2013 legislation, as a manufacturer or distributor of fabricated steel products, under the CPD, it is a legal obligation to adhere to the stringent requirements of BS EN 1090 and for the CE Marking of constructional steelwork. CE Marking ends on the 30th June 2025 in Great Britain. From then on, UKCA marking takes over. Failure to comply with BS EN 1090-1 is heavily penalised within the UK. Starting with suspension notices, application for forfeiture and prohibition notices. Failing to comply may also lead to fines up to £5,000, forced product removal and even imprisonment.
There is also a responsibility for anyone purchasing fabricated steelwork to make sure that they are purchasing from a certified CE (UKCA) supplier/manufacturer. Failure to purchase CE (UKCA) approved steelwork can lead to prosecution and rejection of products from Building Control which can be a costly process to remove and replace goods that were non CE (UKCA) accredited.
In order to achieve our accreditation UKLintels undertakes stringent control measures to comply with BS EN 1090-1 and are measured, audited and accredited by an external body; SCCS (Steel Construction Certification Scheme) who are a UKAS accredited Certified Body (subsidiary of the BCSA). This consists of criteria such as;
- Factory control procedures
- Material control and inspection of supplier material test certification
- The use of qualified welders adhering to our welding procedure specifications
- Quarterly inspections and testing from our Responsible Welding Co-ordinator (RWC)
- Annual audit from the control body SCCS.
- 5 yearly re-testing from the control body SCCS
What does this mean? In essence UKLintels have total traceability of all elements that go in to the steelwork we supply. From our job specific work sheet we can clarify the source of the material used, the welding wire and gas used on your job along with many other control measures that result in you receiving CE/UKCA accredited steelwork to Exc. Class 2.
If you require constructional steelwork which is BS EN 1090-1 compliant, you can do so by browsing the associated products on our website covered under this standard such as Structural Steelwork | Windposts | Special Lintels | Steel Lintels | Thermally Efficient Lintels | Timber Post Supports | Coping Clips .
You can view our Factory Production Control (FPC) and Welding Certification via the links below or confirm the validity of our current certification issued by the SCCS by searching for our name on the SCCS member website; AL Lintels (Batavon) Ltd T/A UKlintels Ltd
FPC CERTIFICATION
WELD CERTIFICATION

At UK Lintels, we have designed our own concept of Thermally Efficient Lintels. Which are the most cost effective and most available from stock, on the market!
What are they?
They’re an energy efficient type of steel lintel used in masonry cavity wall constructions. They provide support over the structural openings (doors and windows), whilst reducing linear thermal bridging heat loss compared to regular cavity lintels. Our own brand version is a split lintel solution. Split lintels are also the most thermally efficient lintel on the market with 0.010 Psi value (Catnic BSD & Angle) compared to 0.043 (Catnic one piece Thermally Broken Lintels).
Psi Value Image Source: Catnic Sept 2022 Product brochure & Separate Lintels Full Fill cavity Wall Construction Psi values 5-2-15. Split lintel data an example of using a Catnic BSD insulated & ANG angle lintel. UltraTherm lintels are am alternative to these two lintels.
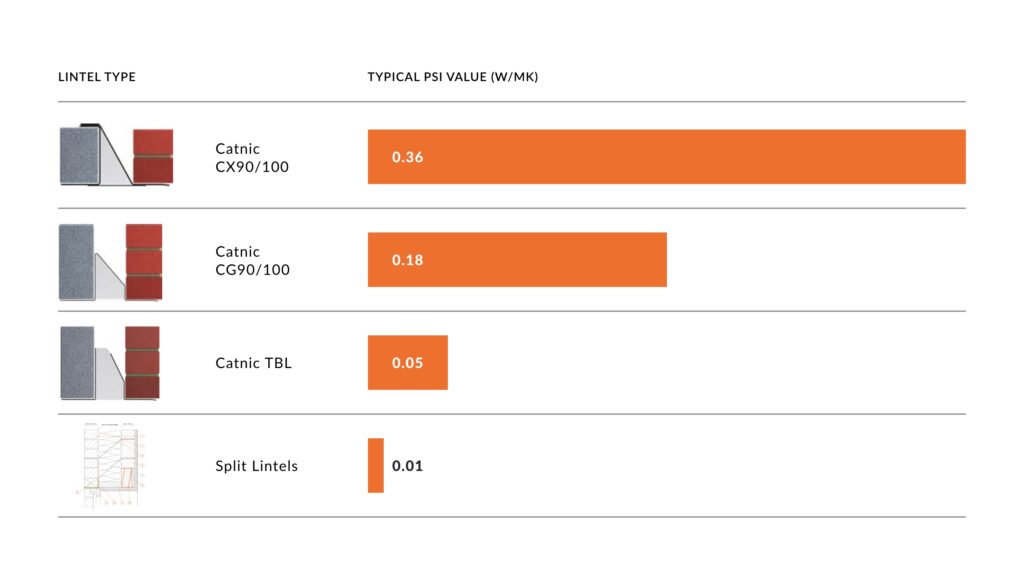
Thermally Efficient Lintel PSI Values Comparison, the graph highlights the typical psi values that can be achieved by using various lintel solutions.
What are the advantages of our UltraTherm Lintels?
- It is the most versatile energy efficient lintel solution on the market.
- This is the most available thermally efficient lintel system, all items are in stock and available for Next Day & Fast Track delivery. Therefore, no costly down time waiting for materials.
- It is the most cost effective (available from stock) thermally efficient lintel solution on the market.
- Suitable for any cavity size. There are no restrictions on cavity widths.
- There is an insulated internal box, therefore, your cavity and the inner leaf is insulated. You do not have this with a one piece thermal lintel.
Why use an UltraTherm Lintel?
Using an energy efficient lintel improves the thermal performance of the wall and focuses on the increasing proportion of heat lost through thermal bridges. Lintels can be a major thermal bridge in a building. Therefore, the lower the psi value, the better for the overall performance.
How can I improve the psi values?
- You may use things such as:
- Lintels with perforated base plates.
- Lintels without base plates.
- UltraTherm split lintels (which is a separate lintel for the inner and outer leaf).
- Thermally broken lintels (Catnic | IG Keystone | Birtley).
Thermal Performance
Target fabric energy rates, target CO2 emission rates, and target primary energy rates for the foundations of the Building Regulations Part L 2021. They set the energy requirements for the new buildings and are all influenced by the performance of the fabric. Selecting a Thermally Efficient Lintel can play a significant role in reducing heat loss associated with thermal bridging.
Heat loss through the building fabric is expressed as a U value and measured in W/M2K, while heat loss via linear thermal bridges is expressed as a psi value and measured in W/Mk. The total fabric heat loss is the sum of the combined fabric U value multiplied by the total area, plus the product psi value of junctions and their total length.
Improving the thermal performance of the wall emphasises the increasing proportion of heat lost through thermal bridges in the building fabric such as lintels. Lintels can be a major thermal bridge in a building, and the lower psi value, the better for overall performance.
Buildability Myths of 2 piece lintels vs 1 piece lintel
There are some myths (created by the manufacturers of the product) that using split lintels isn’t as efficient for buildability purposes. We give some simple answers to those myths;
- Confusion over site installation. One piece manufacturers argue that they are easier to install. We’ve produced an installation guide (right) to assist in the installation of a UltraTherm Split Lintel. Building two courses with separate lintels is not a new concept and will not be alien to any experienced bricklayer. A competent bricklayer will see no issue with this detail.
- No DPC required for a one piece lintel. A DPC is required for a UltraTherm lintel but we would endorse that it is good practice for any opening to have a separate DPC installed above the lintel. IG/Keystone even show this in blue in their product image online and in their brochure. For many areas of the UK a separate DPC is still required for any lintel as per NHBC guidelines.
- Cavity Closer required – Yes, a one piece lintel does close the cavity without a cavity closer but these are very inexpensive items at around £9 for a 2.4m length and available off the shelf. The cavity closure also provides a better overall site detail.
- Lack of stability – Stability between the inner and outer leaf comes from the wall ties. The one piece lintel has very little impact on stability and once the mortar has cured even less.
- Angle and Channel lintels to the outer leaf need to be propped. Whilst it is always good practice to prop single leaf lintels they do not need propping up to 1200mm long as long as they are installed with 2 courses of bricks, allowing the mortar to fully cure before applying further load. 1350mm–2400mm (1 prop), 2550–3600 (2 props), 3750-4800 (3 props).
What we offer
In our Thermally Efficient Split Lintels we offer different duties (Standard, Heavy, Extra Heavy) and various inner/outer leaf sizes to suit your requirements.
This lintel solution is in stock and available for Collection from our branch in Bristol, Next Day Delivery or Fast Track Delivery, Nationwide.
Any more questions?
No problem! You can contact us our technical team will be happy to assist you!
UK Lintels are pleased to announce the launch of our new Special Lintel Configurator. The new Configurator tool is a unique system that allows for the swift manufacture of bespoke lintels to the client’s chosen wall construction and lengths.
The Configurator tool is a simple step process, allowing the client to select;
- Special lintel type (Square bay or Corner)
- Chosen lengths
- Wall construction
- Delivery (next-day available when ordering before 9am)
Reducing manufacturing and lead times
Special Lintels such as corner and bay lintels are made to order items that typically require the client to request a quote and wait for a price – this can take up to a week. Once agreed, the client must wait for the manufacturer to offer a technical drawing for approval, followed by a manufacture time that could take between six to eight weeks.
This whole process takes months, meaning a build could be put on hold.
UK Lintels reduces from weeks and months, to hours and days. Just order online with our Configurator tool and receive next-day delivery.
Why buy Special lintels with UK Lintels?
Configuring and ordering your Special lintel with UK Lintels means;
- Instant pricing – configure online and see the price immediately.
- No requirement for drawing approvals – We manufacture exactly to the lengths that you request.
- Heavy duty – Our system is heavy duty, meaning it can cover most applications and requirements.
- Peace of mind – Damage a section on site or lose a piece? Not a problem. We can re-dispatch a replacement piece next day.
Ready to order?
Special Lintels are made to order on-site and are available for next-day delivery when ordered by 9am, alongside our wide range of concrete and steel lintels.
At the time of writing, the Special Lintel Configurator offers Square bay and Corner lintels. Splayed bay and Splayed bay with returns will be launching in October 2022.
Sign up to our mailing list to be notified when we launch Splayed bay and Splayed bay with returns products.
Buy Windposts online from stock
UKLintels are proud to announce the launch of our innovative new approach to ordering Windposts. Using our Galvanised Windpost Configurator, you can now select the components required and order to your requirements, cutting out the need for long manufacture lead times. Now you can buy online instantly from a nationwide Windposts supplier.
What is a Windpost?
Windposts are used to provide lateral support for panels of brickwork and are installed vertically between floors or between a floor and roof. Manufactured in stainless steel or galvanized windposts are normally bespoke items, designed to suit your specific site requirements and are supplied complete with top and bottom connections and wall ties.
What’s new?
Make your selections based on the top connection, stem length and base connection and then order online. We also provide additional accessories to meet all requirements.
While our new configurator simplifies the process, we advise our clients to seek structural approval of our Windpost system from their consulting structural engineer prior to purchase. Technical specifications and drawings are shown at the bottom of the configurator page.
Ready to buy?
Head over to our Windpost configurator to build galvanised Windposts to your requirements with a range of delivering options available, including next day to UK mainland.
As the new year rolls in, we’re seeing continued increases in both demand and costs for raw materials leading to an unfortunate but inevitable increase in prices for lintels in 2022. We believe the other major steel lintel manufacturers will follow suit with Keystone/IG and Birtley Lintels expecting similar increases around the same time.
Here are the headlines –
- From 1st January 2022 Stressline concrete lintel and padstone price increase of 15%
- From 1st Jan 2022 Stressline steel lintel list price increase of 10%
- From 1st March 2022 Catnic steel lintel list price increase of 10%
As we have referenced before here at UK Lintels, the industry cannot absorb these costs as quotes from industry will outline:
“Our sector continues to experience a significant upturn in demand for building materials, however in addition we have also seen a dramatic increase in the costs to raw materials, plus other outside costs which unfortunately we are unable to absorb.”
Richard Smith, Stressline Sales & Marketing Manager
“The continued inflation on raw material, transport and packaging costs for GALVANISED STEEL LINTELS and ACCESSORIES is likely to remain at elevated levels for the foreseeable future, and we are unable to absorb these additional costs. I therefore wish to formally notify you of a price increase of 10% to our list prices, which shall be effective from 1st March 2022. As always, our efforts are directed at mitigating additional cost to you and we only pass on increases when absolutely necessary. Your business is extremely important to us.”
Mike Murphy, Catnic Sales & Marketing Director
“After a volatile 2021 in the steel lintel market where we witnessed two price increases from Catnic (15.0% 1.04.21) (18.0% 1.07.21) we predicted a third increase would emerge in Q4 2021. We had hoped that prices would stabilise but the announced increase in Q1 2022 are showing no signs of price stability for this coming year. The impact of Covid-19 on the UK’s workforce is still extremely prominent and macro-economic factors such as gas prices are compounding the raw material costs and transportation issues on our sector. To combat this UKLintels have increased their stock holding in 2021 by 500% and invested in further vehicles. By having the stock on the ground means we are not relying on the manufacturers lead-times and can continue to offer steel lintels next working day, nationwide. Our own vehicles give us the flexibility as well as certainty for our distribution channels for our client orders.“
Grant Morris, UKLintels.com Managing Director
Stay updated on market changes
Subscribe to our mailing list to stay up-to-date on price increases and changes in the market as well as news, offers and promotions from UK Lintels.
Steel Lintel price increase announcements
Due to continued material constraints, compounded by energy cost increases, manufacturers including Catnic have announced price increases of up to 20% from July onwards.
Keystone: 18% from 1st July
IG: 18% from 1st July
Catnic: 18% from 1st August
Stressline: 20% from 1st September
UKLintels: 6% average to be applied during October
Q3 in 2022 will see more price increases to the steel lintel market with the above up to 20% price increase announced by the major lintel manufacturers. The macro economic impact on our products continue with raw material price increases compounded with gas/electric, labour and transportation costs pressures for our industry.
“The continued inflation on our general manufacturing and raw material input costs are expected to remain at elevated levels for the foreseeable future. As always, our efforts are directed at mitigating additional cost to you and we only aim to pass on any price increase when absolutely necessary. “
Mike Murphy, Sales and Marketing Director, Catnic
Should you have any pending projects scheduled for the next few months and you can take advantage of advanced purchasing. UKLintels are offering clients the opportunity to Buy Now before the pending price increase takes place to our online prices. Any orders must be ordered online prior to the change in our online prices which will take place during October without notice. Unfortunately, due to demand we would not be able to take an order and hold off on delivery until future dates. All orders must be delivered by the dates shown at checkout when ordering.
Stay updated on market changes
Subscribe to our mailing list to stay up-to-date on price increases and changes in the market as well as news, offers and promotions from UK Lintels.
We’re excited to announce that we are changing our online name to UK Lintels. From today you’ll notice our new domain, logo and some changes throughout our website and online presence.
For over 30 years, we’ve been Catnic lintel and steel lintel distributors. Over this time we have developed considerable infrastructure to distribute lintels across the whole of the UK via our delivery partners and our own fleet vehicles.
Why are we changing to UK Lintels?
As the UK’s largest single site stockists for lintels and our expertise in the sector, we felt that the name change was appropriate and demonstrates our focus and expertise in the space.
UK Lintels Managing Director, Grant Morris said, “Given the huge stock holding we offer our customers along with the expertise and focus we have in this space, it felt like the right time and a natural fit. We’re excited about the change and look forward to serving our customers with excellent service under the new brand for years to come.”
What is changing?
In short – just the name. Everything you know about our service is staying the same. The level of service, delivery options, bespoke cut lengths and online ordering system all stay the same.
Whether it’s a next day order to London or an overnight to Aberdeen – you can continue to rely on UK Lintels to deliver on-time and to your specification.
A note for our customers
While UK Lintels will become our new online trading name, the website remains operated by A.L. Lintels (Batavon) Limited, so you will continue to see this company name referenced on invoices, card statements and documentation issued by us. For any customer queries relating to this change and transition, please contact [email protected]